


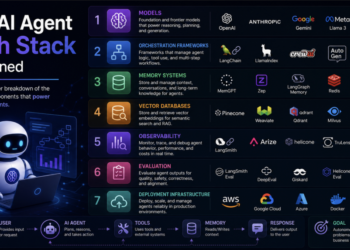
Introduction to AI Brokers
of the last decade. You hear it in all places on job descriptions, tech firms’ profiles, freelancers’ tasks, and so forth. As overwhelming as it might sound, constructing an AI Agent shouldn’t be that troublesome. Quite the opposite, you possibly can simply construct a easy AI Agent in a few minutes. That is what we are going to obtain on this article.
On this article, we are going to undergo the step-by-step technique of constructing an AI Agent. You don’t want any preliminary information, as we are going to clarify every a part of the challenge in easy, beginner-friendly phrases. We will even present a step-by-step information to putting in Python and the related IDE the place we are going to construct this challenge. This can function a devoted AI agent tutorial for the very rookies within the discipline of programming, coding, and AI.
What are AI Brokers?
However first, what precisely are AI Brokers? AI Brokers are software program packages which can be capable of not solely reply particular questions like easy chatbots, however they go a step additional. They can reply questions and make autonomous selections, in addition to create issues and get duties achieved! They will observe, suppose, resolve, and act to finish duties with minimal human enter. Suppose we need to purchase a brand new laptop computer for heavy programming. We are able to ask the identical query to each a chatbot and an AI Agent. The chatbot method can be to counsel laptops for heavy programming after which reply to particular questions one after the other. It waits for person enter, has restricted reminiscence, and works principally as a textual content generator. An AI Agent, then again, takes objectives and performs duties robotically with out the necessity to explicitly ask/direct to a selected characteristic. It researches, compares, plans, and analyzes necessities to make research-backed selections. For our heavy programming laptop computer query, the chatbot will simply reply in a single line, however the AI Agent will give us a comparability desk, point out totally different merchandise, their pricing, and professionals and cons, and support us in making the choice.
How does an AI Agent work?
The AI Agent is a brilliant program that’s coded to meet a aim. As soon as we give it a process, the AI Agent first receives the request, breaks it down into smaller issues to handle, and takes additional enter from the person if required via inquiries to correctly perceive and meet all necessities. It then makes use of acceptable instruments like net looking, calculators, and its personal reminiscence to gather extra info, and analyzes this info rigorously. It compares totally different choices and curates the reply to the person’s wants.

Now that we all know what AI Brokers are and the way they work, allow us to begin coding our personal personalised AI Agent.
Constructing an AI Academic Agent in Python
On this article, we are going to construct an AI Academic Agent that can act as your private schooling assistant.
Earlier than we start the coding and rationalization, allow us to guarantee that we’ve our platform necessities fulfilled:
Putting in Python
If you’re a whole newbie, chances are high that you’ve by no means put in Python in your system. This can be a challenge based mostly on Python, so we have to set up it on our system. Click on on this hyperlink, and observe the steps.
Throughout set up, verify the field: “Add Python to PATH”, then click on “Set up Now”.
Putting in and Organising PyCharm
Every time we’re coding, we’d like an acceptable platform or workspace that enables us to write down code, run the code, set up related libraries and packages, and debug our code for errors. That is the place IDE, which stands for Built-in Improvement Atmosphere, comes into play. An IDE is an software that gives a platform or workspace for writing, testing, and debugging code. For Python coding, we are able to use various IDEs like Spyder, Jupyter Notebooks, and Visible Studio, to call a couple of. The selection of utilizing a selected IDE ought to be dependent in your proficiency in coding, your consolation zone, and, most significantly, your area and what you need to obtain via your coding. On this tutorial, we are going to use PyCharm as our coding atmosphere, because it facilitates an in-built terminal and straightforward library set up, good for newbie tasks.
You may set up the IDE from the next hyperlink: https://www.jetbrains.com/pycharm/obtain
Merely select “Group Version” and choose the obtain choice specific to your working system.

As soon as PyCharm is put in, allow us to transfer ahead to creating our challenge file.
Organising the Challenge and Creating the Python File
Subsequent, we are going to create our challenge file in PyCharm. A challenge in PyCharm is sort of a folder that may have inside it totally different recordsdata: Python code recordsdata, libraries, an atmosphere file, and so forth. The best way we are going to go ahead is first launch PyCharm, create a brand new Challenge, select the placement of your challenge, and create the Challenge. Subsequent, we are going to create a Python file, major.py which is able to include the principle code. As soon as the file is created, you possibly can take a look at your set up by writing a generic code and working it.

print("Welcome to my new challenge on AI Brokers")
You may see within the above screenshot the challenge title displayed, the placement of the challenge, the generic code used for testing, the run button to execute the code, and lastly the output of the code. If you may get right here, you will have every thing working positive!
Creating the Atmosphere File
Now, we are going to create a brand new file, which would be the atmosphere file. Atmosphere recordsdata retailer secret info safely for the challenge and are often named as .env. It’s used to avoid wasting keys, passwords, and configuration settings for our challenge, making our challenge safer {and professional}. On this challenge, we are going to create an atmosphere file and retailer our API key in it (extra about APIs later).

As might be seen, we’ve created a brand new file named atmosphere. It’s on this file that we are going to safely retailer the API Key for this challenge within the variable API_KEY (I’ve added the API key already and hidden it). We are going to later set up and import the dotenv Python library that helps our program learn secret info from a .env file, in our case, the API key.
Creating the API Key
Now the subsequent process is to create an API Key to make use of in our code. However first, allow us to perceive what an API Key’s!
API stands for Software Programming Interface. It’s a algorithm or protocols that enable two distinct software program programs to speak with one another. We are able to share info from one program to a different by utilizing an API that connects them each. You may perceive this as a waiter in a restaurant that acts as an middleman between the purchasers and the kitchen. The purchasers ship an order to the kitchen for a specific dish, and that is completed via the designated waiter. Within the programming world, one software program software sends a request to a different software program software via the API. Climate apps use APIs to get dwell climate information from related climate servers. In our challenge of constructing an AI Agent in Python, we use APIs to attach with already constructed AI fashions and use their options in our program.

To ensure that our program to attach with an AI mannequin, we’d like an API key. The API key offers permission for this communication to occur. Now there are a variety of the way to get API keys on-line and entry AI fashions. A few of these methods are free, others should not. On this challenge, we can be utilizing OpenRouter which is a unified interface for LLMs and AI Fashions. We are able to simply create an API key and use it in our tasks without cost as soon as we’ve created the account. The rationale why we’re utilizing OpenRouter as an alternative of different AI mannequin platforms like Google Gemini, OpenAI, and so forth, is that not solely is it free, nevertheless it additionally permits us to decide on any AI mannequin of our selection utilizing that API key. It additionally facilitates rookies with fashions that don’t require excessive computing.
Now, to create the API key in OpenRouter, go to their official web site, open up your account. As soon as the account is created, go to the OpenRouter dashboard and click on on the “Get API Key”.


Click on on the “+ New Key” icon to create your API key. Specify the challenge. Upon getting accessed the important thing, copy it and paste it into your env file API_KEY variable that we created earlier than. This key shouldn’t be shared publicly anyplace!
Putting in the Related Dependencies
Now that our API secret’s created and safely secured within the .env file, allow us to return to our major.py file and begin coding. The very first thing is to put in and import the related dependencies/packages. We’re doing this challenge in Python, which is only a coding language with fundamental inbuilt features and instruments. However with a purpose to broaden our functionalities, we’d like some extra highly effective instruments and features that the Python commonplace library doesn’t present. It is because of this that we make use of different Python packages and libraries, by first putting in them in our Python system after which importing them in our code.
On this challenge, we’d like Python to speak with already constructed AI fashions, ship requests, and course of requests. Since these functionalities should not accessible in the usual Python library, we are going to set up the OpenAI Python library after which import it into our code. To put in, go to the terminal icon in your PyCharm IDE after which sort:
pip set up openai
As soon as the OpenAI library is put in, we are going to import it into our major.py file:
from openai import OpenAISubsequent, with a purpose to entry the API in our .env file, we are going to set up and import the dotenv Python library that’s designed to learn info from .env recordsdata.
Within the terminal (not the Python file), write the next code for set up of the dotenv library.
pip set up python-dotenvNow that the library is put in, import it as we imported the OpenAI library. We will even import the Python os library. This library helps Python talk with the working system to handle system-related duties, entry recordsdata, folders, and atmosphere variables, and create paths. In our challenge, we are going to use the dotenv library to load the .env file and os library to retrieve the values from it.
from dotenv import load_dotenv
import os
Loading the API Key within the Major Python File
As soon as importing libraries is accomplished, subsequent we are going to learn the .env file and retrieve the API key. For this function, we are going to use two features: load_dotenv(), which tells Python to open and browse the .env file, and getenv(), which retrieves the knowledge we’d like from that file.
load_dotenv()
api_key = os.getenv("API_KEY")
Creating the Shopper
We are going to transfer ahead with constructing the consumer for our challenge. The consumer is principally an object of the OpenAI Class (in case you already know about OOP) that enables your code to speak with OpenAI’s servers. It facilitates authentication and supplies a structured option to ship requests to AI fashions. We are able to contemplate it the messenger that requires an API key for authentication functions and sends and receives requests and responses to and from the AI mannequin.
Right here is the syntax of the consumer initialization:
consumer = OpenAI(
    api_key,
    base_url="https://openrouter.ai/api/v1"
)
We have now used a ready-made blueprint from the OpenAI library to create an object consumer that takes an API key that we’ve already retrieved from the .env file. This key will enable the consumer to speak with the AI fashions via the URL that we’ve supplied. In our case, we’ve chosen OpenRouter AI fashions: https://openrouter.ai/api/v1
Creating the Infinite Chat Loop
Subsequent, we are going to create the infinite loop that can maintain happening till we cease it manually (or we are able to add extra performance). In Python, this infinite loop might be achieved with a whereas loop, which is principally a loop that repeats repeatedly till a situation turns into false. In our challenge, the whereas loop can be used to maintain the chatbot working repeatedly. So as soon as the AI Agent has answered a query, it’s going to ask the person for the subsequent immediate. Together with whereas key phrase, we are going to add the key phrase True so the loop won’t ever cease robotically,
whereas True:
    #Code inside this loop will carry on working till manually stopped
Taking Enter from the Person & Displaying Processing Standing
The following process is to take enter from the person. That is principally what the person will ask the AI Agent. We are going to create a variable known as query, inside which we are going to retailer the enter from the person. Then, with a purpose to present the processing standing, or that this system is definitely working within the background (how slowly although), and isn’t frozen, as a result of AI fashions do take processing time, we are going to show the road “Pondering…” within the output. We are going to use the Python print perform for this function, as proven within the code block beneath. On this means, the person will know that their enter query has been acquired and is now being processed.
query = enter("You: ")
print("Pondering...n")
Sending the AI Request, Deciding on Mannequin & Message System
Now that the person has requested the query, and it has been saved contained in the variable, query the subsequent process is to allow the communication of our program with an current AI mannequin. We are going to use the chat.completions.create() technique within the OpenAI Python library to generate responses from the AI fashions. The reply to the person’s query after efficient communication can be saved within the variable response. We are going to choose a mannequin from this hyperlink. I’ve used the mannequin baidu/cobuddy:free due to it being sooner than others I beforehand used. As soon as we’ve specified the mannequin title from OpenRouter, we are going to then work on the dialog between the person and AI.
We are going to retailer this dialog within the variable messages, which is definitely a Python dictionary having keys: function and content material. The best way Python dictionaries work is that we’ve keys, and values related to these keys.
| Function | System | Person |
| Content material | You’re a useful instructional tutor | query |
Inside our dictionary, we are going to outline the content material for each roles, system and person. For the system, the content material of the function is "You're a useful instructional tutor" that achieves our aim of constructing an AI Academic Agent. The person’s content material is the query which the person will ask. Allow us to code the above state of affairs:
    response = consumer.chat.completions.create(
        mannequin="baidu/cobuddy:free",
        messages=[
            {
                "role": "system",
                "content": "You are a helpful educational tutor."
            },
            {
                "role": "user",
                "content": question
            }
        ]
    )
Every time the above is processed, the AI fashions will take the person’s query and the system’s content material collectively and generate solutions combining each of the above. The generated reply is returned within the variable response. That is the principle step of our challenge the place our AI Agent is definitely speaking to the AI mannequin. We are able to change the mannequin title from the second line.
Extracting the AI Response and Printing it to the Person
Subsequent, we have to output/print the AI-generated textual content. To do that, we are going to take the entire generated reply that was saved within the response variable. The response from the AI mannequin may have totally different selections we are able to select from. We are going to select the primary response by giving it the index [0]. Subsequent, we are going to entry the message’s content material, which is the precise reply from the AI. Coding this may appear like this:
 reply = response.selections[0].message.content material

 print("nAI:", reply)
 print("n-------------------n")
Discover that we’ve accessed the dictionary message, after which additional printed out the worth saved in opposition to the important thing “content material“.
Operating the Code
Now allow us to run the code!

You may see the code working within the picture above, and the AI responding to questions. However you’ll very possible discover that the solutions generated are very gradual. It is because we’ve used a free mannequin in our challenge, and they’re utilized by others as effectively, and typically it is perhaps hosted on gradual servers. However, if the processing time is simply too lengthy, contemplate altering the AI mannequin from OpenRouter. It is possible for you to to fund quick one after some hit and trial!
Conclusion
On this article, we’ve efficiently created an Academic AI Agent that responds to our questions. We have now coded the challenge from scratch, with the assistance of sure dependencies, and have seen how we are able to code such tasks in Python as rookies. This was an easy tutorial that employed the very fundamentals and confirmed us that constructing an AI shouldn’t be that arduous in any case. It comes right down to having a really fundamental information of the basics and the power to make use of already created packages and modules to get the work achieved for us.


