


Why?
, however I don’t prefer it. Why? It fails to do something extra difficult than fundamental voice instructions.
I find yourself utilizing it for 3 issues:
- Get the present date or time
- Get climate info for immediately
- Activate or off related gadgets (e.g. TV, lights, robotic vacuum)
that are the one issues that I can use it for reliably. The rest, I get a well mannered and unhelpful “I can’t assist with that”.
Given the rise of LLM Brokers and MCP servers, it’s develop into simpler than ever to create private assistants and chatbots. And I ask myself,
“Why cease at a chatbot? Why not take this one step additional and create my very own voice assistant?”
That is my try and just do that.
Targets
So I feel, what precisely do I would like my voice assistant to have the ability to do?
That is my checklist of preliminary objectives:
1. Run on my native pc
I don’t need to pay for a subscription to make use of an LLM, and in reality, I don’t need to pay for something.
All the things I construct ought to simply run on my native pc with out having to fret about prices or how a lot free credit score I’ve left on the finish of every month.
2. Replicate Alexa performance
Let’s take child steps — first I merely need to replicate the performance I have already got with Alexa. This shall be milestone to work in direction of, earlier than I add extra complicated, extravagant options.
It ought to have the ability to:
- Get the present date or time
- Get climate info for immediately
- Activate or off related gadgets (e.g. TV, lights, robotic vacuum)
earlier than we begin constructing this out right into a fully-fledged Tony Stark’s Jarvis-esque voice assistant that may compute easy methods to journey again in time.
3. Be fast
If the responses aren’t quick sufficient, the voice assistant is nearly as good as being silent.
Asking a query and ready over a minute for a response is unacceptable. I would like to have the ability to ask a query and get a response in an affordable period of time.
Nevertheless, I do know that working something regionally on my cute little Macbook Air goes to be gradual, no matter what number of tweaks and refactorings I do.
So for now, I’m not going to count on millisecond-level response occasions. As an alternative the response occasions must be faster than the time it takes me to execute the duty/question myself. At the very least on this means I do know that I’m saving time.
In future articles, we’ll delve deeper into the optimisations I do to get this all the way down to millisecond response occasions with out paying for subscriptions.
My System Specs
- System: Macbook Air
- Chip: Apple M3
- Reminiscence: 16GB
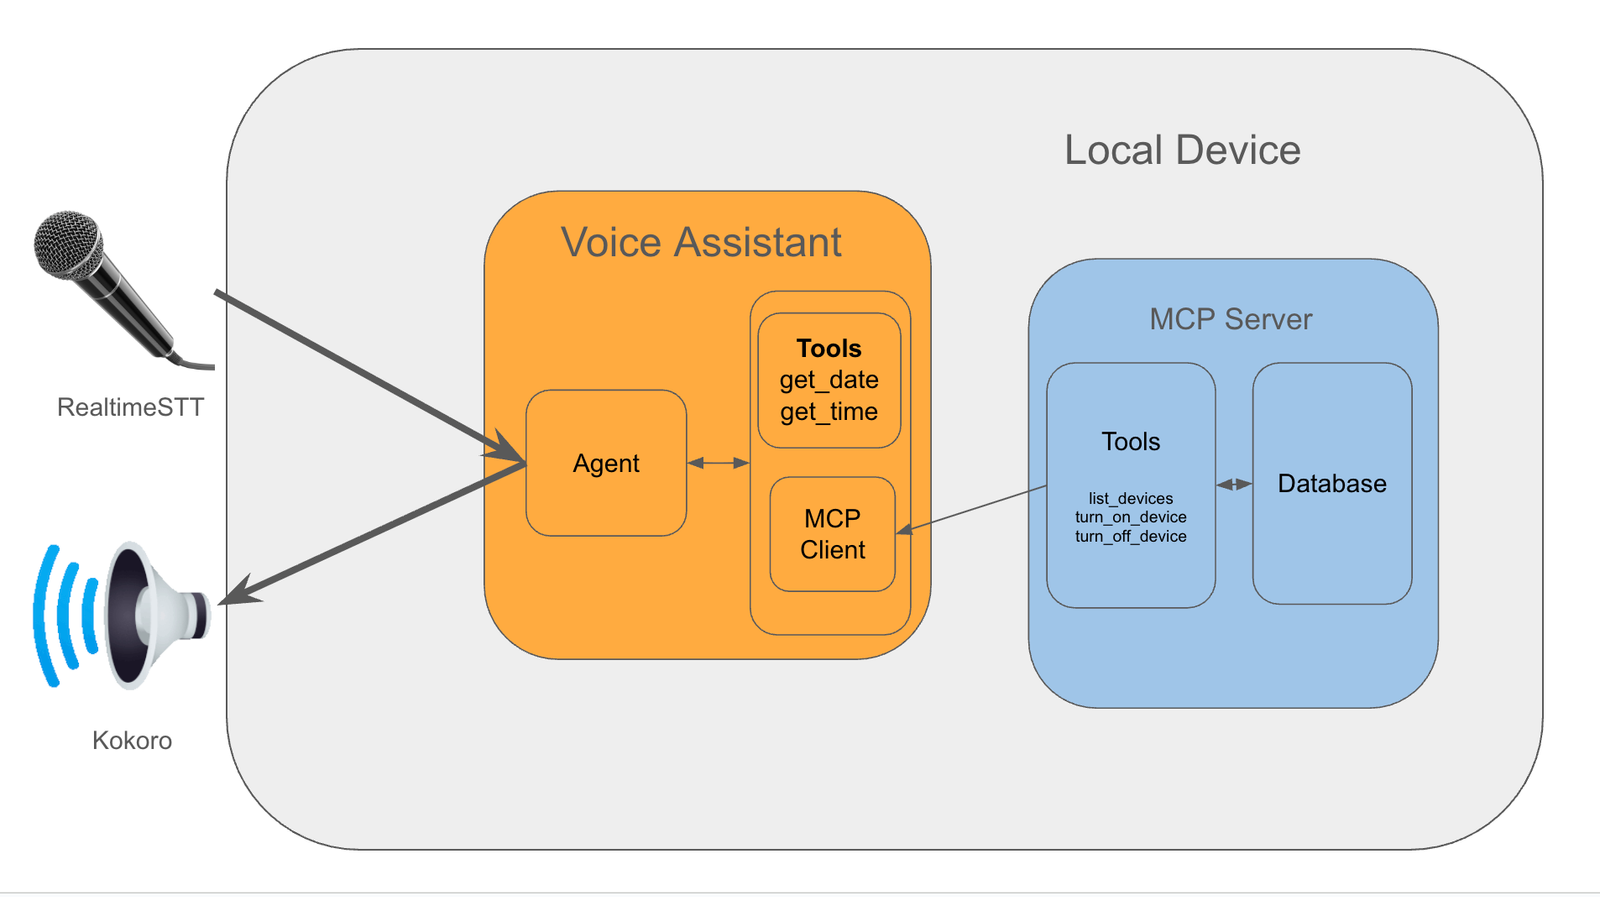
1. General Construction
I’ve structured the undertaking as follows:

Voice Assistant
1. Speech-to-Textual content & Textual content-to-speech
We make use of RealtimeSTT for wakeword detection (e.g. “Alexa”, “Hey Jarvis”, “Hey Siri”), speech detection and real-time speech-to-text transcription.
The transcribed textual content is then despatched to the Agent for processing, after which its response is then streamed to a Kokoro text-to-speech mannequin. The output is then despatched to the speaker.
2. Agent
We use Ollama to run LLMs regionally. The agent and the workflow that it takes is applied in LangGraph.
The agent is answerable for taking a person question, perceive it, and name on the instruments it thinks are required to offer an applicable response.
Our voice assistant would require the next instruments to satisfy our objectives:
- A perform to get the present date.
- A perform to get the present time.
It additionally wants instruments to work together with smart-home gadgets, however the implementation for this will get fairly concerned so we implement this in a separate MCP server.
3. MCP Server for smart-home Connection
The MCP server is the place we encapsulate the complexity of discovering, connecting to, and managing the gadgets.
A SQL database retains observe of gadgets, their connection info and their names.
In the meantime, instruments are the interface by which an agent finds the connection info for a given gadget, after which makes use of it to show the gadget on or off.
Let’s now dive deeper into the implementation particulars of every part.
Need entry to the code repository?
For these of you who want to get entry to the voice-assistant code that accompanies this text, take a look at my Patreon web page right here to get entry PLUS unique entry to group chats the place you’ll be able to speak straight with me about this undertaking.
2. Implementation Particulars
Textual content-to-speech (TTS) Implementation

The text-to-speech layer was maybe the best to implement.
Given some string we assume comes from the agent, cross it by a pre-trained text-to-speech mannequin and stream it to the gadget speaker.
Firstly, let’s outline a category known as Voice that shall be answerable for this.
We all know upfront that aside from the mannequin that we use for speech synthesis, receiving textual content and streaming it to the speaker would be the identical and might stay decoupled from something mannequin associated.
class Voice():
    def __init__(
        self,
        sample_rate: int = 24000,
        chunk_size: int = 2048
    ):
        self.sample_rate = sample_rate
        self.chunk_size = chunk_size
        self.initialise_model()

    def initialise_model(self):
        """Initialise the mannequin to make use of for TTS."""
        cross

    def convert_text_to_speech(self, textual content:str) -> checklist[np.ndarray]:
        """Convert textual content to sepeech and return the waveform as frames."""
        cross

    def converse(self, textual content:str):
        """Converse the offered textual content by gadget output."""
        frames = self.convert_text_to_speech(self, textual content)
        for body in frames:
            self.output_stream.write(body.tobytes())
so we are able to implement the converse perform to stream the textual content to the speaker upfront.
Now, we are able to determine which mannequin is on the market, which one to make use of, and easy methods to use it, after which wire it up into our Voice class.
TTS Fashions Testing
Under, I checklist the varied completely different TTS fashions that I experimented with, and the code you need to use to duplicate the outcomes.
1. BarkModel (Hyperlink)
Quickstart code to run the mannequin your self:
from IPython.show import Audio
from transformers import BarkModel, BarkProcessor

mannequin = BarkModel.from_pretrained("suno/bark-small")
processor = BarkProcessor.from_pretrained("suno/bark-small")
sampling_rate = mannequin.generation_config.sample_rate

input_msg = "The time is 3:10 PM."

inputs = processor(input_msg, voice_preset="v2/en_speaker_2")
speech_output = mannequin.generate(**inputs).cpu().numpy()

Audio(speech_output[0], fee=sampling_rate)
Abstract
- Good: Very real looking voice synthesis with pure sounding ‘umm’, ‘ahh’ filler phrases.
- Dangerous: High quality is worse with shorter sentences. The tip of the sentence is spoken as if a comply with up sentence will rapidly comply with.
- Dangerous: Very gradual. Takes 13 seconds to generate the speech for “The time is 3:10 PM.”
2. Coqui TTS (Hyperlink)
Set up utilizing:
pip set up coqui-ttsTake a look at code
from IPython.show import Audio
from TTS.api import TTS

tts = TTS(model_name="tts_models/en/ljspeech/tacotron2-DDC", progress_bar=False)

output_path = "output.wav"
input_msg = "The time is 3:10 PM."
tts.tts_to_file(textual content=input_msg, file_path=output_path)
Audio(output_path)
Abstract
- Good: Quick. Takes 0.3 seconds to generate the speech for “The time is 3:10 PM.”
- Dangerous: Textual content normalisation is lower than scratch. In terms of time associated queries, the pronunciation of “PM” is off. When the time is about to “13:10 PM”, the pronunciation of “13” is unrecognisable.
3. Elevenlabs (Hyperlink)
Set up utilizing:
pip set up elevenlabsand run utilizing:
import dotenv
from elevenlabs.shopper import ElevenLabs
from elevenlabs import stream

dotenv.load_dotenv()

api_key = os.getenv('elevenlabs_apikey')

elevenlabs = ElevenLabs(
  api_key=api_key,
)

audio_stream = elevenlabs.text_to_speech.stream(
    textual content="The time is 03:47AM",
    voice_id="JBFqnCBsd6RMkjVDRZzb",
    model_id="eleven_flash_v2_5"
)

stream(audio_stream)
Abstract
By far the most effective by way of high quality and response occasions, which clearly it must be given it’s a paid service.
In addition they present some free credit and not using a subscription, however I’d fairly not develop into depending on it in any respect when growing my voice assistant so we skip it for now.
4. Kokoro (Hyperlink)
We go away the most effective til final.
Set up utilizing:
pip set up kokoro pyaudioTake a look at code:
RATE = 24000
CHUNK_SIZE = 1024

p = pyaudio.PyAudio()
print(f"Enter gadget: {p.get_default_input_device_info()}")
print(f"Output gadget: {p.get_default_output_device_info()}")

output_stream = p.open(
    format=pyaudio.paFloat32,
    channels=1,
    fee=RATE,
    output=True,
)
input_msg = "The time is 03:47AM"
generator = pipeline(input_msg, voice='af_heart')
for i, (gs, ps, audio) in enumerate(generator):
    print(i, gs, ps)

    for begin in vary(0, len(audio), CHUNK_SIZE):
        chunk = audio[start:start + CHUNK_SIZE]
        output_stream.write(chunk.numpy().astype(np.float32).tobytes())
Abstract
Firstly, it’s fast — it’s on par with Elevenlabs, solely marginally slower, not likely noticeable given the instance textual content.
Secondly, the standard of the speech can also be good. Positive, it could possibly be higher, there are events the place it sounds barely clunky.
However on common the standard of the outputs are spot on.
Defining the Voice Class
So, we resolve to make use of Kokoro for our text-to-speech implementation. Let’s now fill within the blanks for our Voice class. Additionally take into account that it is a first implementation, and I do know sooner or later I’ll need to attempt different fashions.
So as an alternative of implementing the mannequin particular code straight into the Voice class, I’ll create a toddler class that inherits from Voice.
This fashion, I can do a fast switcharoo between completely different fashions with out having to vary the Voice class or unravel code that has develop into coupled.
from kokoro import KPipeline

class KokoroVoice(Voice):
    def __init__(self, voice:str, sample_rate: int = 24000, chunk_size: int = 2048):
        """Initialise the mannequin to make use of for TTS.

        Args:
            voice (str):
                The voice to make use of.
                See https://github.com/hexgrad/kokoro/blob/most important/kokoro.js/voices/
                for all voices.
            sample_rate (int, non-obligatory):
                The pattern fee to make use of. Defaults to 24000.
            chunk_size (int, non-obligatory):
                The chunk dimension to make use of. Defaults to 2048.
        """
        self.voice = voice
        tremendous().__init__(sample_rate, chunk_size)

    def initialise_model(self):
        """Load the mannequin to make use of for TTS."""
        self.pipeline = KPipeline(lang_code="b")

    def convert_text_to_speech(self, textual content:str) -> checklist[np.ndarray]:
        """Convert textual content to speech and return the waveform as frames."""
        generator = self.pipeline(textual content, voice=self.voice)
        frames = []
        for i, (_, _, audio) in enumerate(generator):
            for begin in vary(0, len(audio), self.chunk_size):
                chunk = audio[start : start + self.chunk_size]
                frames.append(chunk.numpy().astype(np.float32))
        return frames
Now, this implementation permits us to easily import and instantiate this class on the level the place we obtain textual content from the agent, and stream it to the gadget speaker utilizing:
textual content = "Hi there world"
voice = KokoroVoice(**kwargs)
voice.converse(textual content)
SmartHome MCP Server Implementation

This MCP server is devoted to discovering, connecting and managing smarthome gadgets. It lives in a separate repository, properly separated from the voice assistant.
On the time of writing, the one smarthome gadget I’ve is a Tapo Sensible Plug. You possibly can work together with Tapo gadgets through the use of the python-kasa library.
Our server must do the next:
- Given a tool identify, flip it on or off.
- Uncover new gadgets and add them to the database.
- Replace the gadget database with the newest gadget info — this consists of the identify of the gadget, the IP deal with and the MAC deal with.
1. Database
Firstly, let’s have a look at how we’ll retailer the gadget info in a SQL database. For simplicity I’ll select duckdb because the database backend.
Units Desk
We firstly outline the schema for our first (and solely) desk known as gadget.
# src/smarthome_mcp_server/database.py

import os
import duckdb
from dataclasses import dataclass


@dataclass
class TableSchema:
    identify:str
    columns:dict[str, str]
    primary_key:checklist[str]


def get_device_table_schema():
    return TableSchema(
        identify="gadget",
        columns={
            "device_id" : "VARCHAR",
            "identify": "VARCHAR",
            "ip_address": "VARCHAR",
        },
        primary_key=["device_id"],
    )
The device_id is the first key, and by definition have to uniquely determine all gadgets in our house. Fortunately, every Tapo gadget has a singular device-id that we are able to use.
The identify is what the person can be referencing because the gadget identify. For instance, in our case, the Tapo Sensible Plug is related to our front room mild, and is known as lights. This identify is assigned by way of thee Tapo App.
Lastly, the ip_address column would be the IP Handle that’s used to connect with the gadget in an effort to management it.
DB Initialisation
We create some helper features like get_create_table_if_not_exists_query and initialise_database features that we are able to name to invoke to create the DB on first startup.
For brevity, I present simply the initialise_database perform for the reason that former is self-explanatory:
def initialise_database(db_path:os.PathLike) -> duckdb.DuckDBPyConnection:
    """Get the database connection and create the tables if they do not exist."""
    conn = duckdb.join(db_path)

    # initialise if not exists tables
    conn.execute(
        get_create_table_if_not_exists_query(get_device_table_schema())
    )

    return conn
System administration
Lastly, we implement the code that shall be interacting with the gadgets and updating the database.
import duckdb
from dotenv import

class DeviceManager:
    def __init__(self, conn:duckdb.DuckDBPyConnection) -> None:
        self._conn = conn

    ...

    async def turn_on_device(self, device_name: str) -> str:
        """Activate a tool.

        Args:
            device_name (str):
                The identify of the gadget to activate.
        """
        attempt:
            gadget = await self._get_device(device_name)
        besides DeviceNotFoundError as e:
            logger.exception(e)
            return f"System {device_name} not discovered."

        await gadget.turn_on()
        return f"System {device_name} turned on."

    async def turn_off_device(self, device_name: str) -> str:
        """Flip off a tool.

        Args:
            device_name (str):
                The identify of the gadget to show off.
        """
        attempt:
            gadget = await self._get_device(device_name)
        besides DeviceNotFoundError as e:
            logger.exception(e)
            return f"System {device_name} not discovered."

        await gadget.turn_off()
        return f"System {device_name} turned off."

    async def list_devices(self) -> checklist[str]:
        """Record the obtainable gadget names.

        Returns:
            checklist[str]:
                A listing of gadget names.
        """
        outcomes = self._conn.question("SELECT identify FROM gadget").fetchall()

        return [result[0] for lead to outcomes]
The three strategies above would be the public strategies that we register as instruments for our Voice Assistant.
We’ve omitted the non-public strategies for brevity.
One factor that I’ve realised since scripting this code is that DeviceManager may be very Tapo particular. After having checked out integrating non-Tapo gadgets, I realised I’ve been naive to assume that different good gadget APIs would comply with the identical, standardised sample.
So sooner or later, this class will should be modified to TapoDeviceManager, and additional abstractions will should be made to accommodate this variability.
For instance, just lately I’ve received some Wiz lightbulbs for my bed room. Seems, the API doesn’t fetch the names assigned to every gadget by way of the app, which was obtainable in Tapo by default.
Due to this fact, I might want to consider some approach to fetch this within the backend, or use the voice-assistant to populate it when it doesn’t exist.
3. Expose the instruments to Voice-Assistant utilizing FastMCP
Lastly, we have to expose the strategies we’ve written as instruments for our voice assistant to make use of.
from fastmcp import FastMCP

def register_device_manager_tools(mcp_instance: FastMCP, device_manager: DeviceManager) -> FastMCP:
    """Register the strategies outlined in DeviceManager as instruments for MCP server."""
    mcp_instance.software(name_or_fn=device_manager.list_devices)
    mcp_instance.software(name_or_fn=device_manager.turn_off_device)
    mcp_instance.software(name_or_fn=device_manager.turn_on_device)
    return mcp_instance


async def populate_database(device_manager: DeviceManager):
    """Discover all gadgets which can be obtainable and replace the database.

    Uncover all obtainable gadgets and get their newest states.

    Word:
        System names could have modified by way of the cell app, thus this
        step is important when beginning the server.
    """
    all_devices = await device_manager.discover_new_devices()
    upsert_coroutines = [device_manager._upsert_device(device) for device in all_devices.values()]
    await asyncio.collect(*upsert_coroutines)


def initialise_server(db_path: os.PathLike) -> FastMCP:
    """Initialise the server.

    Args:
        db_path (os.PathLike):
            The trail to the duckdb database which
            shops the server info.
    Returns:
        FastMCP: The FastMCP server.
    """
    conn = initialise_database(db_path)
    device_manager = DeviceManager(conn)

    # discover all gadgets which can be obtainable and replace the database
    asyncio.run(populate_database(device_manager))

    mcp = FastMCP(
        identify="smarthome-mcp-server",
        directions="This server is for locating and controlling smarthome gadgets.",
    )

    register_device_manager_tools(mcp, device_manager)
    return mcp
initialise_server is the place we initialise and pre-populate the database, and run the server.
Discover we populate the database on startup every time. That is needed since gadget names may have been up to date by way of the Tapo app between runs, so that is an try and fetch probably the most up-to-date info for all gadgets.
Now, I do know there are some holes within the implementation — it’s a primary try and an ongoing undertaking, so for those who see any points or potential enhancements please let me know by way of my Patreon account (see finish of article).
Server Entry Level
We use typer to make our server right into a CLI app.
# __main__.py

load_dotenv()

app = typer.Typer()
console = Console()


@app.command()
def most important():
    config = load_config()

    # arrange server knowledge listing
    root_dir = platformdirs.user_data_path(
        appname="smarthome-mcp-server",
        ensure_exists=True
    )
    db_path = Path(root_dir) / config.database.path
    db_path.father or mother.mkdir(dad and mom=True, exist_ok=True)
    logger.data("Server knowledge listing: %s", db_path)

    # init and run
    mcp_instance = initialise_server(db_path)
    asyncio.run(mcp_instance.run_stdio_async())

if __name__ == "__main__":
    app()
We then run the server python3 -m smarthome_mcp_server:
╭─ FastMCP 2.0 ────────────────────────────────────────────────────────────╮
│                                                                          │
│        _ __ ___ ______           __  __  _____________    ____           │
│    ____                                                                  │
│       _ __ ___ / ____/___ ______/ /_/  |/  / ____/ __   |___   / __    │
│                                                                         │
│      _ __ ___ / /_  / __ `/ ___/ __/ /|_/ / /   / /_/ /  ___/ / / / /    │
│    /                                                                     │
│     _ __ ___ / __/ / /_/ (__  ) /_/ /  / / /___/ ____/  /  __/_/ /_/     │
│    /                                                                     │
│    _ __ ___ /_/    __,_/____/__/_/  /_/____/_/      /_____(_)____/    │
│                                                                          │
│                                                                          │
│                                                                          │
│    🖥️  Server identify:     smarthome-mcp-server                              │
│    📦 Transport:       STDIO                                             │
│                                                                          │
│    📚 Docs:            https://gofastmcp.com                             │
│    🚀 Deploy:          https://fastmcp.cloud                             │
│                                                                          │
│    🏎️  FastMCP model: 2.11.2                                            │
│    🤝 MCP model:     1.12.4                                            │
│                                                                          │
╰──────────────────────────────────────────────────────────────────────────╯


[08/19/25 05:02:55] INFO     Beginning MCP server              server.py:1445
                             'smarthome-mcp-server' with
                             transport 'stdio'
4. Utilizing the SmartHome Instruments
Now that the server has been applied, we are able to now outline some strategies that may work together with the server by way of a shopper. This shopper shall be used to register the instruments for the Voice Assistant to make use of.
Coming again to the voice-assistant repo:
from langchain_mcp_adapters.shopper import MultiServerMCPClient

def get_new_mcp_client() -> MultiServerMCPClient
    return MultiServerMCPClient(
        {
            "smarthome-mcp-server": {
                "command": "smarthome_mcp_server",
                "args": [],
                "transport": "stdio",
            }
        }
    )
This technique makes use of the handy MultiServerMCPClient class to register our smarthome MCP server for software utilization.
The returned shopper object then exposes a get_tools technique which returns all of the instruments that the registered servers expose.
mcp_client = get_new_mcp_client()
instruments = await mcp_client.get_tools()
Word how we use await right here given the get_tools technique is asynchronous.
By defining a perform known as get_mcp_server_tools:
def get_mcp_server_tools():
    mcp_client = get_new_mcp_client()
    instruments = await mcp_client.get_tools()
    return instruments
this single perform may be imported into wherever we outline our agent and register the instruments to be used.
Speech-to-text Implementation

Speech-to-text (STT) is the place lots of complexity is available in because it requires realtime IO processing.
STT itself is easy sufficient to realize — there are many fashions on the market that we are able to use. However what makes it complicated is the necessity to have the ability to continually hear for a person’s voice enter, which consists of a wakeword and a question.
A wakeword is what you usually use to set off a voice assistant to start out listening to you. For instance, “Hey Google” or “Hey Siri”, or “Alexa”.
I may write this code fully myself, however to make issues less complicated, I had a fast dig round simply in case there was one thing pre-built that I may use.
And to my shock, I discovered the package deal RealtimeSTT (hyperlink right here) and it really works completely.
The way it works in a nutshell
- Create a thread for listening to the person’s voice enter. One other for transcribing, which runs the STT mannequin.
- If a wakeword is detected, begin recording the person’s voice enter.
- The recorded audio is then despatched to the STT mannequin for transcribing, and returns the transcribed textual content as a string.
To make use of this package deal, all we have to do is use the AudioToTextRecorder class as a context supervisor like under:
from RealtimeSTT import AudioToTextRecorder

with AudioToTextRecorder(
    mannequin='tiny',
    wakeword_backend='oww',
    wake_words='hey jarvis',
    gadget='cpu',
    wake_word_activation_delay=3.0,
    wake_word_buffer_duration=0.15,
    post_speech_silence_duration=1.0
) as recorder:
    whereas True:
        # get the transcribed textual content from recorder
        question = recorder.textual content()
        if (question just isn't None) and (question != ""):

            # get response from our langgraph agent
            response_stream = await get_response_stream(
                question, agent_executor, thread_config
            )

            # output the response to gadget audio
            await stream_voice(response_stream, output_chunk_builder, voice)
We are going to come again to get_response_stream and stream_voice strategies within the subsequent part, since this additionally entails how we outline our agent.
However merely placing collectively the AudioToTextRecorder context supervisor in the best way now we have, we’ve received a working speech -> textual content -> response mechanism applied.
Should you have been to easily substitute the get_response_stream with any LLM agent, and substitute the stream_voice with any text-to-speech agent, you’d have a working voice assistant.
You would additionally use a easy print assertion and you’d have a rudimentary chat bot with voice enter.
Agent Implementation
Lastly, the great things — the agent implementation.
I’ve left this as final because it’s a bit extra concerned. Let’s get caught in.
LangGraph — What’s it?
LangGraph is a framework for constructing stateful, graph-based workflows with language mannequin brokers.
Nodes encapsulate any logic associated to an motion an LLM agent can take.
Edges encapsulate the logic which determines easy methods to transition from one node to a different.
LangGraph implements a prebuilt graph that we are able to get by way of the create_react_agent technique. The graph appears to be like like this:

create_react_agent techniqueLet’s use this for example to clarify higher how nodes and edges work.
As you’ll be able to see, the graph may be very easy:
- Given a question (the
__start__node) - The
agentnode will obtain the question and decide whether or not it must name a software to have the ability to reply appropriately.- If it does, we transition to the
softwarenode. As soon as the software response is acquired, we return to theagentnode. - The agent will repeatedly name the suitable instruments till it determines it has every thing it wants.
- If it does, we transition to the
- Then, it can return its response (the
__end__node)
The conditional transition between the agent, instruments and __end__ node is represented as dashed strains. Then, the query is:
How can we decide which node to go to subsequent?
Properly, Langgraph maintains a log of the messages which have been despatched, and this represents the state of the graph.
The messages can come from the person, the agent, or a software. On this instance, the agent node will create a message that explicitly states that it’ll name a software (precisely how shall be revealed within the subsequent part).
The presence of this software name is what triggers the transition from the agent node to the instruments node.
If no instruments are known as, then the transition from the agent node to the __end__ node is triggered.
It’s this examine for the presence of software calls that’s applied within the conditional edge between the agent, instruments and __end__ nodes.
In a future article, I’ll go into an instance of how I created a customized agent graph to optimise for latency, and show how precisely these conditional edges and nodes are applied.
For now, we don’t want to enter an excessive amount of element about this for the reason that prebuilt graph is nice sufficient for the scope of this text.
Our Agent Implementation
So, we outline a perform known as get_new_agent like under:
from langgraph.prebuilt import create_react_agent
from langgraph.graph.state import CompiledStateGraph

from voice_assistant.instruments.datetime import get_tools as get_datetime_tools


def get_new_agent(
    config, short_term_memory, long_term_memory
) -> CompiledStateGraph:
    """Construct and return a brand new graph that defines the agent workflow."""

    # initialise the LLM
    mannequin = init_chat_model(
        mannequin=config.Agent.mannequin,
        model_provider=config.Agent.model_provider,
        temperature=0,
        reasoning=config.Agent.reasoning
    )

    # initialise the instruments that the agent will use
    server_tools = await get_mcp_server_tools()

    instruments = (
        get_datetime_tools()
        + server_tools
    )

    # construct the agent workflow given the LLM, its instruments and reminiscence.
    agent_executor = create_react_agent(
        mannequin,
        instruments,
        checkpointer=short_term_memory,
        retailer=long_term_memory
    )

    return agent_executor
which is answerable for:
- Initialising the LLM
init_chat_modelreturns the LLM from the required supplier. In our case, we use Ollama as our supplier, andllama3.2:newestas our mannequin sort.
- Defining the total set of instruments that the agent will use.
- We’ve got a perform known as
get_datetime_tools()which returns achecklistofStructuredToolobjects. - We even have
server_tools, that are the checklist of instruments that our beforehand talked about MCP server offers for house automation. - Moreover, If we want to prolong the set of instruments the agent can use, that is the place so as to add them.
- We’ve got a perform known as
- Assemble the agent workflow given the LLM and its instruments.
- Right here we name the
create_react_agentperform from LangGraph. - The perform also can soak up
checkpointerandretailerobjects that are used to persist the state of the agent, performing as a brief time period and long run reminiscence. - Sooner or later, if we need to use a customized graph, we are able to substitute the
create_react_agentperform name with our personal implementation.
- Right here we name the
Dealing with the Agent Response
Now, we’ve up to now applied all of the elements that we have to
- Get the person question
- Get the instruments
- Create the agent
The subsequent step is to run the agent to get a response for the question, and output it by way of the Voice technique we outlined earlier.
Given the person question textual content that we’ve acquired from our STT implementation, we format it right into a dictionary:
user_query = "Hi there world!"
user_query_formatted = {
    "function": "person",
    "content material": user_query
}
This dictionary tells the agent that the message is from the person.
We additionally add a system immediate to set the context and provides directions to the agent:
system_prompt_formatted = {
    "function": "system",
    "content material": (
        "You're a voice assistant known as Jarvis."
        + " Maintain your responses as brief as doable."
        + "Don't format your responses utilizing markdown, similar to **daring** or _italics. ",
    )
}
These two messages are then handed into the agent to get a response:
response = agent_executor.invoke(
    {"messages" : [system_prompt_formatted, user_query_formatted]},
)
The response is a dictionary of messages (for brevity we omit any superfluous content material):
output
> {
    "messages": [
        SystemMessage(
            content="You are a voice assistant called Jarvis.Keep your responses as short as possible.Do not format your responses using markdown, such as **bold** or _italics. ",
            additional_kwargs={},
            ...
        ),
        HumanMessage(
            content="What time is it?",
            additional_kwargs={},
            ...
        ),
        AIMessage(
            content="",
            additional_kwargs={},
            tool_calls=[
                {
                    "name": "get_current_time",
                    "args": {},
                    "id": "b39f7b12-4fba-494a-914a-9d4eaf3dc7d1",
                    "type": "tool_call",
                }
            ],
            ...
        ),
        ToolMessage(
            content material="11:32PM",
            identify="get_current_time",
            ...
        ),
        AIMessage(
            content material="It is at the moment 11:32 PM.",
            additional_kwargs={},
            ...
        ),
    ]
}
As you’ll be able to see, the output is an inventory of all of the messages which have been created all through the graph execution.
The primary message will all the time be a HumanMessage or a SystemMessage since that is what we offered to the agent as enter (i.e. the __start__ node).
The remaining are the messages that the agent or instruments returned, within the order they have been known as.
For instance, you’ll be able to see the primary AIMessage, the message sort generated by the LLM, has a software name inside it which makes use of a get_current_time software.
The presence of a tool_calls property within the AIMessage is what triggers the conditional transition from the agent node to the instruments node.

agent and instruments highlighted in purple.Then you definately see the ToolMessage which is the response that was returned by the get_current_time software.
Lastly, the mannequin responds with the precise response to the person question. The dearth of a tool_calls property within the AIMessage implies that the graph ought to transition to the __end__ node and return the response.
Decreasing Latency

Coming again to invoking the agent to get a response, the difficulty with utilizing the invoke technique is that we anticipate the complete workflow to finish earlier than we get a response.
This may take a very long time, particularly if the agent is addressing a posh question. In the meantime, the person is ready idly for the agent to reply, which leads to a poor person expertise.
So to enhance on this, we are able to use the stream mode in LangGraph to stream the response as they’re generated.
This permits us to start out voicing the response as they arrive, fairly than ready for the complete response to be generated after which voicing it multi functional go.
output_stream = agent_executor.stream(
    {"messages" : [system_prompt_formatted, user_query_formatted]},
    stream_mode="messages"
)
Right here, output_stream is a generator that may yield a tuple of messages and message metadata, as they arrive.
Word, there may be an asynchronous model of this technique known as astream, which does precisely the identical factor however returns an AsyncIterator as an alternative.
If we have a look at the messages we get after this transformation:
print([chunk for chunk, metadata in output])

>   AIMessageChunk(
        content material="",
        tool_calls=[{"name": "get_current_time", ...}],
        tool_call_chunks=[{"name": "get_current_time", "args": "{}", ...}],
    ),
    ToolMessage(content material="01:21AM", identify="get_current_time", ...),
    AIMessageChunk(content material="It", ...),
    AIMessageChunk(content material="'s", additional_kwargs={}, ...),
    AIMessageChunk(content material=" at the moment", ...),
    AIMessageChunk(content material=" ",),
    AIMessageChunk(content material="1", ...),
    AIMessageChunk(content material=":", ...),
    AIMessageChunk(content material="21", ...),
    AIMessageChunk(content material=" AM", ...),
    AIMessageChunk(content material=".", ...),
    AIMessageChunk(content material="", ...),
Now you can see the tokens are being returned as they’re generated.
However this poses a brand new drawback!
We are able to’t simply give the TTS mannequin particular person tokens, since it can simply pronounce every token one after the other, i.e. "It", "'s" shall be pronounced individually, which is certainly not what we would like.
So, there’s a tradeoff that we have to make
Whereas we have to stream the response to minimise person wait time, will nonetheless want to attend to build up sufficient tokens that type a significant chunk, earlier than sending them to the TTS mannequin.
Constructing Output Chunks
We due to this fact deal with this complexity by defining an OutputChunkBuilder. So what constitutes a significant chunk?
The very first thing that involves thoughts is to attend till a full sentence, i.e. append all of the tokens till it ends with considered one of ., ?, ;, !.
From trial and error, it has additionally confirmed smart to incorporate n on this checklist as properly, after we get a very lengthy response from the agent that makes use of bullet factors.
class OutputChunkBuilder:
    def __init__(self):
        self._msg = ""
        self.end_of_sentence = (".", "?", ";", "!", "n")

    def add_chunk(self, message_chunk:str):
        self._msg += message_chunk

    def output_chunk_ready(self) -> bool:
        return self._msg.endswith(self.end_of_sentence)
We obtain this with the above code, consisting of 1 perform that appends message chunks collectively right into a buffer known as _msg, and one to examine if the collated messages are prepared (i.e. is it a full sentence or does it finish with a brand new line).
class OutputChunkBuilder:

    ... # omitted for brevity

    def _reset_message(self):
        self._msg = ""

    def get_output_chunk(self):
        msg = self._msg # Get the present message chunk
        self._reset_message()
        return msg
We additionally implement the get_output_chunk perform which is able to return the messages collated up to now, and in addition reset the message buffer to an empty string in order that it’s prepared for collating the subsequent set of chunks.
This permits us to make use of logic like under to stream the response, sentence by sentence:
def stream_voice(msg_stream, output_chunk_builder):
    for chunk, metadata in msg_stream:
        # append the chunk to our buffer
        if chunk.content material != "":
            output_chunk_builder.add_chunk(chunk.content material)

        # converse the output chunk whether it is prepared
        if output_chunk_builder.output_chunk_ready():
            voice.converse(output_chunk_builder.get_output_chunk())
Instruments Implementation

Lastly, let’s have a look at how we are able to implement the instruments required to get the present date and time.
That is very simple, by far the best implementation. Any perform that you just create can be utilized as a software so long as the docstrings are well-written and formatted clearly.
There are two most important methods to mark a perform as a software:
- Utilizing the
@softwaredecorator fromlangchain_core.instruments - Utilizing the
StructuredToolclass fromlangchain_core.instruments.structured
For simpler unit testing of our instruments, we go for the second possibility for the reason that first possibility doesn’t permit us to import the software perform into our checks.
First, write the features to get the time and date as we might do usually:
# instruments/datetime.py

from datetime import datetime
from langchain_core.instruments.structured import StructuredTool


def get_now_datetime() -> datetime:
    """Wrapper for simpler mocking in unit check."""
    return datetime.now()

def get_current_time() -> str:
    """Get the present time in format HH:MM AM/PM"""
    return get_now_datetime().strftime("%I:%Mpercentp")
Moreover, we write a easy wrapper perform known as get_now_datetime that returns the present datetime, which additionally makes it simpler to mock in our unit checks.
Subsequent, a perform for getting the present date.
def _convert_date_to_words(dt: datetime):
    """Change date values represented in YYYY-mm-dd format to phrase values as they'd be pronounced."""
    day = dt.day
    if day == 1 or day == 21 or day == 31:
        day_word = f"{day}st"
    elif day == 2 or day == 22:
        day_word = f"{day}nd"
    elif day == 3 or day == 23:
        day_word = f"{day}rd"
    else:
        day_word = f"{day}th"

    date_obj = dt.strftime(f"%B {day_word}, %Y")
    return date_obj

def get_current_date() -> str:
    """Get the present date in format YYYY-MM-DD"""
    dt = get_now_datetime()
    dt_str = _convert_date_to_words(dt)
    return dt_str
We’ve got to watch out right here — completely different text-to-speech (TTS) fashions have various skills in terms of textual content normalisation.
Instance
If the perform
get_current_datereturns the string01-01-2025, the TTS mannequin could pronounce this as ‘oh one oh one twenty twenty 5‘.
To make our implementation sturdy to such variations, we normalise the date string to be clearer in how the date must be pronounced utilizing the _convert_date_to_words perform.
In doing so, we convert a datetime object like datetime(2025, 1, 1) into January 1st, 2025.
Lastly, we write a get_tools perform which is able to wrap up the get_current_time and get_current_date strategies right into a StructuredTool, and return them in an inventory:
def get_tools():
    """Get an inventory of instruments for the agent.

    Returns:
        A listing of software features obtainable to the agent.
    """
    return [
        StructuredTool.from_function(get_current_time),
        StructuredTool.from_function(get_current_date),
    ]
thereby permitting us to import this perform and callling it after we create the agent, as we noticed within the agent implementation part.
Placing all of it collectively to construct our Agent
Now, we’ve gone by the person elements that make up our voice assistant, time to assemble them collectively.
# most important.py

from RealtimeSTT import AudioToTextRecorder
from langgraph.checkpoint.sqlite.aio import AsyncSqliteSaver
from langgraph.retailer.sqlite.aio import AsyncSqliteStore

from voice_assistant.agent import get_new_agent, get_response_stream
from voice_assistant.voice import KokoroVoice
from settings import load_config


async def most important():

    conf = load_config()
    voice = KokoroVoice(**conf.KokoroVoice)
    output_chunk_builder = OutputChunkBuilder()
    thread_config = {"configurable": {"thread_id": "abc123"}}

    # brief time period reminiscence
    async with AsyncSqliteSaver.from_conn_string(conf.Agent.reminiscence.checkpointer) as saver:

            # long run reminiscence
            async with AsyncSqliteStore.from_conn_string(conf.Agent.reminiscence.retailer) as retailer:

                agent_executor = await get_new_agent(conf, saver, retailer)

                with AudioToTextRecorder(**conf.AudioToTextRecorder) as recorder:
                    whereas True:
                        question = recorder.textual content()
                        if (question just isn't None) and (question != ""):
                            response_stream = await get_response_stream(
                                question, agent_executor, thread_config
                            )
                            await stream_voice(response_stream, output_chunk_builder, voice)


if __name__ == "__main__":
    asyncio.run(most important())
Firstly, we load in our Yaml config file utilizing OmegaConf (hyperlink right here). The settings module and the load_config implementation is like under:
# settings.py

import logging
from pathlib import Path
from omegaconf import OmegaConf


logger = logging.getLogger(__name__)


CONFIG_PATH = Path(__file__).dad and mom[1] / "conf" / "config.yaml"


def load_config():
    logger.debug(f"Loading config from: {CONFIG_PATH}")
    return OmegaConf.load(CONFIG_PATH)
Secondly, we use SQL databases to retailer our brief and long run reminiscence — that is achieved utilizing the AsyncSqliteSaver and AsyncSqliteStore courses from the checkpoint and retailer modules in langgraph.
from langgraph.checkpoint.sqlite.aio import AsyncSqliteSaver
from langgraph.retailer.sqlite.aio import AsyncSqliteStore

    ... # omitted for brevity

    # brief time period reminiscence
    async with AsyncSqliteSaver.from_conn_string(conf.Agent.reminiscence.checkpointer) as saver:

            # long run reminiscence
             async with AsyncSqliteStore.from_conn_string(conf.Agent.reminiscence.retailer) as retailer:

                 agent_executor = await get_new_agent(conf, saver, retailer)
                 ... # omitted for brevity
Then, shortly loop, the STT thread information the person’s voice enter after a wakeword is detected, which is then handed to the agent for processing.
The agent response is returned as an AsyncIterator, which we then stream to the gadget audio system utilizing the stream_voice perform.
The stream_voice perform appears to be like like this:
async def stream_voice(
    msg_stream: AsyncGenerator,
    output_chunk_builder: OutputChunkBuilder,
    voice: Voice
):
    """Stream messages from the agent to the voice output."""
    async for chunk, metadata in msg_stream:
        if metadata["langgraph_node"] == "agent":
            # construct up message chunks till a full sentence is acquired.
            if chunk.content material != "":
                output_chunk_builder.add_chunk(chunk.content material)

            if output_chunk_builder.output_chunk_ready():
                voice.converse(output_chunk_builder.get_output_chunk())

    # if now we have something left within the buffer, converse it.
    if output_chunk_builder.current_message_length() > 0:
        voice.converse(output_chunk_builder.get_output_chunk())
Which is similar logic as we already mentioned earlier than within the Constructing Output Chunks part, however with some small tweaks.
It seems, not all responses finish with a punctuation mark.
For instance, when the LLM makes use of bullet factors of their response, I’ve discovered they omit the punctuation for every bullet level.
So, we be sure to flush our buffer on the finish if it isn’t empty.
We additionally filter out any messages that aren’t from the agent, as we don’t need to stream the person’s enter or the software responses again to the gadget audio system. We do that by checking the langgraph_node metadata key, and solely talking the message if it comes from the agent.
And seems, that’s all you want to construct a completely functioning voice assistant.
Ultimate Remarks
General, I’ve been pleasantly shocked at how straightforward it was to construct this out.
Positive, there are definitely extra optimisations that may be made, however given I’ve been in a position to get the total performance working inside two weeks (while working a full-time job), I’m proud of the outcomes.
However we’re not achieved but.
There are an entire load of issues I couldn’t focus on to cease this text changing into a complete ebook, similar to the extra optimisations I’ve needed to make to make the voice assistant faster, so this shall be coated in my subsequent article.
For these of you who loved this text, take a look at my different articles on Medium, at https://medium.com/@bl3e967


