


On this article, you’ll discover ways to prepare a Scikit-learn classification mannequin, serve it with FastAPI, and deploy it to FastAPI Cloud.
Matters we are going to cowl embody:
- Tips on how to construction a easy challenge and prepare a Scikit-learn mannequin for inference.
- Tips on how to construct and take a look at a FastAPI inference API domestically.
- Tips on how to deploy the API to FastAPI Cloud and put together it for extra production-ready utilization.

Prepare, Serve, and Deploy a Scikit-learn Mannequin with FastAPI
Picture by Writer
Introduction
FastAPI has turn into some of the standard methods to serve machine studying fashions as a result of it’s light-weight, quick, and simple to make use of. Many machine studying and AI purposes use FastAPI to show educated fashions into easy APIs that may be examined, shared, and deployed in manufacturing.
On this information, you’ll discover ways to prepare, serve, and deploy a Scikit-learn mannequin with FastAPI. We’ll begin by establishing a easy challenge, then prepare a mannequin on a toy dataset, construct a FastAPI inference server, take a look at it domestically, and eventually deploy it to FastAPI Cloud.
1. Setting Up the Mission
Begin by creating a brand new folder to your challenge and establishing a easy listing construction. It will assist preserve your coaching code, software code, and saved mannequin information organized from the start.
Run the next instructions in your terminal:
|
mkdir sklearn–fastapi–app cd sklearn–fastapi–app mkdir app artifacts contact app/__init__.py |
After that, your challenge construction ought to seem like this:
|
sklearn–fastapi–app/ ├── app/ │ ├── __init__.py │ └── essential.py ├── artifacts/ ├── prepare.py ├── pyproject.toml └── necessities.txt |
Subsequent, create a necessities.txt file and add the next dependencies:
|
fastapi[standard] scikit–study joblib numpy |
These packages will likely be used to construct and run the API, prepare the Scikit-learn mannequin, save the educated mannequin, and deal with numerical enter knowledge.
As soon as the file is prepared, set up the dependencies with:
|
pip set up –r necessities.txt |
At this level, the challenge skeleton is prepared, and you may transfer on to coaching your first Scikit-learn mannequin.
2. Coaching the Machine Studying Mannequin
On this part, you’ll prepare a easy Scikit-learn classification mannequin utilizing the built-in breast most cancers dataset.
The script hundreds the dataset, splits it into coaching and testing units, trains a RandomForestClassifier, evaluates its accuracy, and saves all the pieces wanted for inference right into a .joblib file contained in the artifacts folder.
Create a prepare.py file with the next code:
|
1 2 3 4 5 6 7 8 9 10 11 12 13 14 15 16 17 18 19 20 21 22 23 24 25 26 27 28 29 30 31 32 33 34 35 36 37 38 39 40 41 42 43 44 45 46 |
from pathlib import Path import joblib from sklearn.datasets import load_breast_cancer from sklearn.ensemble import RandomForestClassifier from sklearn.metrics import accuracy_score from sklearn.model_selection import train_test_split
def essential(): knowledge = load_breast_cancer() X = knowledge.knowledge y = knowledge.goal
X_train, X_test, y_train, y_test = train_test_split( X, y, test_size=0.2, random_state=42, stratify=y, )
mannequin = RandomForestClassifier( n_estimators=200, random_state=42, ) mannequin.match(X_train, y_train)
predictions = mannequin.predict(X_test) accuracy = accuracy_score(y_test, predictions)
artifact = { “mannequin”: mannequin, “target_names”: knowledge.target_names.tolist(), “feature_names”: knowledge.feature_names, }
output_path = Path(“artifacts/breast_cancer_model.joblib”) output_path.mum or dad.mkdir(mother and father=True, exist_ok=True) joblib.dump(artifact, output_path)
print(f“Mannequin saved to: {output_path}”) print(f“Take a look at accuracy: {accuracy:.4f}”)
if __name__ == “__main__”: essential() |
As soon as the file is prepared, run the coaching script out of your terminal:
You need to see output much like this:
|
Mannequin saved to: artifacts/breast_cancer_model.joblib Take a look at accuracy: 0.9561 |
This implies the mannequin was educated efficiently, evaluated on the take a look at cut up, and saved for later use within the FastAPI software.
3. Constructing the FastAPI Server
Now that the mannequin has been educated and saved, the following step is to construct a FastAPI server that hundreds the saved mannequin and serves predictions via an API.
This software hundreds the mannequin as soon as when the server begins, offers a easy well being verify endpoint, and exposes a /predict route that accepts characteristic values and returns each the expected class and sophistication possibilities.
Create app/essential.py with the next code:
|
1 2 3 4 5 6 7 8 9 10 11 12 13 14 15 16 17 18 19 20 21 22 23 24 25 26 27 28 29 30 31 32 33 34 35 36 37 38 39 40 41 42 43 44 45 46 47 48 49 50 51 52 53 54 55 56 57 58 59 60 61 62 63 64 65 66 67 68 69 70 71 72 73 74 75 76 77 78 79 80 81 82 83 84 85 86 87 88 89 90 91 92 93 94 95 96 97 98 99 100 101 102 103 104 105 106 107 108 109 110 111 112 113 114 115 116 117 118 119 |
from pathlib import Path import joblib import numpy as np from fastapi import FastAPI, HTTPException from pydantic import BaseModel
ARTIFACT_PATH = Path(“artifacts/breast_cancer_model.joblib”)
app = FastAPI( title=“Breast Most cancers Prediction API”, model=“1.0.0”, description=“A FastAPI server for serving a scikit-learn breast most cancers classifier”, )
class PredictionRequest(BaseModel): mean_radius: float mean_texture: float mean_perimeter: float mean_area: float mean_smoothness: float mean_compactness: float mean_concavity: float mean_concave_points: float mean_symmetry: float mean_fractal_dimension: float radius_error: float texture_error: float perimeter_error: float area_error: float smoothness_error: float compactness_error: float concavity_error: float concave_points_error: float symmetry_error: float fractal_dimension_error: float worst_radius: float worst_texture: float worst_perimeter: float worst_area: float worst_smoothness: float worst_compactness: float worst_concavity: float worst_concave_points: float worst_symmetry: float worst_fractal_dimension: float
@app.on_event(“startup”) def load_model(): if not ARTIFACT_PATH.exists(): elevate RuntimeError( f“Mannequin file not discovered at {ARTIFACT_PATH}. Run `python prepare.py` first.” )
artifact = joblib.load(ARTIFACT_PATH) app.state.mannequin = artifact[“model”] app.state.target_names = artifact[“target_names”]
@app.get(“/well being”) def well being(): return {“standing”: “okay”}
@app.put up(“/predict”) def predict(request: PredictionRequest): strive: options = np.array([[ request.mean_radius, request.mean_texture, request.mean_perimeter, request.mean_area, request.mean_smoothness, request.mean_compactness, request.mean_concavity, request.mean_concave_points, request.mean_symmetry, request.mean_fractal_dimension, request.radius_error, request.texture_error, request.perimeter_error, request.area_error, request.smoothness_error, request.compactness_error, request.concavity_error, request.concave_points_error, request.symmetry_error, request.fractal_dimension_error, request.worst_radius, request.worst_texture, request.worst_perimeter, request.worst_area, request.worst_smoothness, request.worst_compactness, request.worst_concavity, request.worst_concave_points, request.worst_symmetry, request.worst_fractal_dimension, ]])
mannequin = app.state.mannequin target_names = app.state.target_names
prediction_id = int(mannequin.predict(options)[0]) possibilities = mannequin.predict_proba(options)[0]
return { “prediction_id”: prediction_id, “prediction_label”: target_names[prediction_id], “possibilities”: { target_names[i]: float(spherical(possibilities[i], 6)) for i in vary(len(target_names)) } }
besides Exception as e: elevate HTTPException(status_code=500, element=str(e)) |
This FastAPI app does three helpful issues.
It hundreds the educated mannequin as soon as throughout startup, exposes a /well being endpoint so you possibly can rapidly verify whether or not the server is operating, and offers a /predict endpoint that accepts enter options and returns an inference end result. This makes it straightforward to show your Scikit-learn mannequin right into a reusable API that different purposes or companies can name.
4. Testing the Mannequin Inference Server Domestically
With the FastAPI app prepared, the following step is to run it domestically and take a look at whether or not the prediction endpoint works as anticipated. FastAPI makes this straightforward as a result of it routinely detects your software, begins a neighborhood improvement server, and offers built-in interactive API documentation that you need to use instantly from the browser.
Begin the server with:
As soon as the server begins, FastAPI will serve the API domestically, often on port 8000.
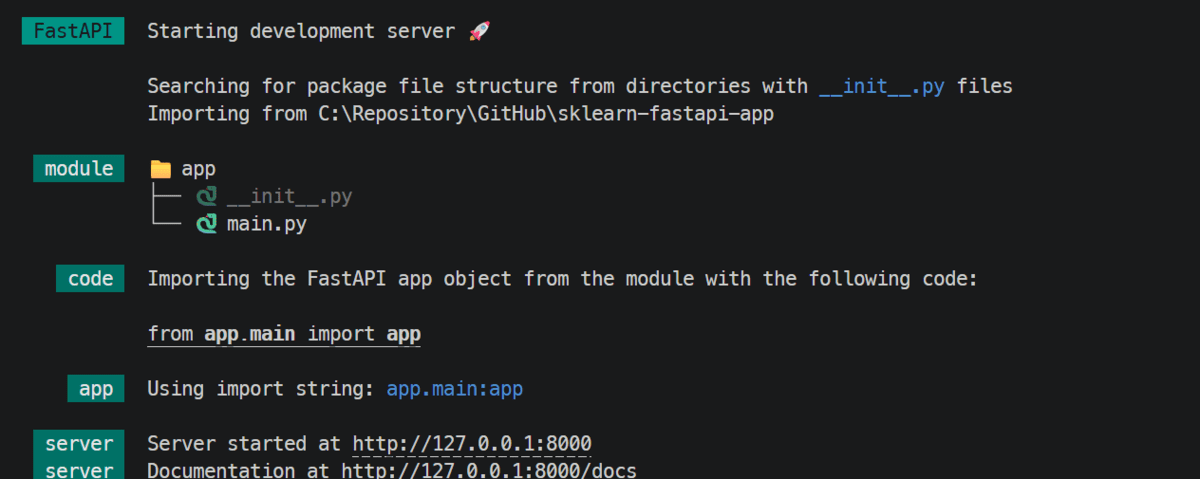
FastAPI will serve the API domestically
Subsequent, open the interactive API docs in your browser:
|
http://127.0.0.1:8000/docs |
Contained in the docs web page, you possibly can take a look at the /predict endpoint instantly. Increase the endpoint, click on Strive it out, paste within the enter values, and execute the request.
You may as well take a look at the API from the terminal utilizing curl:
|
1 2 3 4 5 6 7 8 9 10 11 12 13 14 15 16 17 18 19 20 21 22 23 24 25 26 27 28 29 30 31 32 33 34 |
curl –X POST “http://127.0.0.1:8000/predict” –H “Content material-Sort: software/json” –d ‘{ “mean_radius”: 17.99, “mean_texture”: 10.38, “mean_perimeter”: 122.8, “mean_area”: 1001.0, “mean_smoothness”: 0.1184, “mean_compactness”: 0.2776, “mean_concavity”: 0.3001, “mean_concave_points”: 0.1471, “mean_symmetry”: 0.2419, “mean_fractal_dimension”: 0.07871, “radius_error”: 1.095, “texture_error”: 0.9053, “perimeter_error”: 8.589, “area_error”: 153.4, “smoothness_error”: 0.006399, “compactness_error”: 0.04904, “concavity_error”: 0.05373, “concave_points_error”: 0.01587, “symmetry_error”: 0.03003, “fractal_dimension_error”: 0.006193, “worst_radius”: 25.38, “worst_texture”: 17.33, “worst_perimeter”: 184.6, “worst_area”: 2019.0, “worst_smoothness”: 0.1622, “worst_compactness”: 0.6656, “worst_concavity”: 0.7119, “worst_concave_points”: 0.2654, “worst_symmetry”: 0.4601, “worst_fractal_dimension”: 0.1189 }’ |
The response will likely be returned as JSON, together with the expected class ID, the expected label, and the likelihood scores for every class.
This confirms that the inference server is working domestically and is able to be deployed.
5. Deploying the API to the Cloud
After you have completed testing the API domestically, you possibly can cease the event server by urgent CTRL + C. The following step is to deploy the applying to FastAPI Cloud. FastAPI Cloud helps deployment instantly from the CLI, and the usual movement is fastapi login adopted by fastapi deploy.
Log in with:
After logging in, deploy the app with:
In the course of the first deployment, the CLI can information you thru setup, reminiscent of choosing or making a crew and selecting whether or not to create a brand new app or hyperlink to an current one.
FastAPI Cloud then packages and uploads your code, installs dependencies within the cloud, deploys the applying, and verifies that deployment accomplished efficiently. After the primary deploy, it additionally creates a .fastapicloud listing in your challenge so later deployments are less complicated.
A profitable deployment will finish with output much like this:
|
✅ Prepared the hen! 🐔 Your app is prepared at https://sklearn-fastapi-app.fastapicloud.dev |
As soon as the app is reside, open the deployed docs web page in your browser to verify that the endpoints are working.
You may as well take a look at the deployed API from the terminal by changing the native URL along with your cloud URL.
Lastly, you possibly can go to the FastAPI Cloud dashboard, click on your deployed app, and verify the logs to observe builds, startup habits, and runtime points.
What to Do Subsequent
You now have a whole end-to-end workflow in place: a educated machine studying mannequin, a FastAPI software for inference, native testing, and a deployment on FastAPI Cloud.
To take this additional and attain an actual manufacturing degree, the following step is to make the API safe, examined, monitored, and in a position to deal with real-world visitors reliably at scale.
- Safe the API by including API key safety or a stronger authentication layer.
- Strengthen error dealing with so failures are clear, constant, and simpler to troubleshoot.
- Enhance efficiency so the API can reply effectively beneath heavier visitors.
- Take a look at extra deeply with unit checks, endpoint checks, and cargo testing.
- Add monitoring to trace uptime, latency, errors, and general utilization.
- Refine deployment workflows with versioning, rollback plans, and safer releases.
That’s what turns a working deployed API into one that may function extra reliably in the true world.
On this article, you’ll discover ways to prepare a Scikit-learn classification mannequin, serve it with FastAPI, and deploy it to FastAPI Cloud.
Matters we are going to cowl embody:
- Tips on how to construction a easy challenge and prepare a Scikit-learn mannequin for inference.
- Tips on how to construct and take a look at a FastAPI inference API domestically.
- Tips on how to deploy the API to FastAPI Cloud and put together it for extra production-ready utilization.
Prepare, Serve, and Deploy a Scikit-learn Mannequin with FastAPI
Picture by Writer
Introduction
FastAPI has turn into some of the standard methods to serve machine studying fashions as a result of it’s light-weight, quick, and simple to make use of. Many machine studying and AI purposes use FastAPI to show educated fashions into easy APIs that may be examined, shared, and deployed in manufacturing.
On this information, you’ll discover ways to prepare, serve, and deploy a Scikit-learn mannequin with FastAPI. We’ll begin by establishing a easy challenge, then prepare a mannequin on a toy dataset, construct a FastAPI inference server, take a look at it domestically, and eventually deploy it to FastAPI Cloud.
1. Setting Up the Mission
Begin by creating a brand new folder to your challenge and establishing a easy listing construction. It will assist preserve your coaching code, software code, and saved mannequin information organized from the start.
Run the next instructions in your terminal:
|
mkdir sklearn–fastapi–app cd sklearn–fastapi–app mkdir app artifacts contact app/__init__.py |
After that, your challenge construction ought to seem like this:
|
sklearn–fastapi–app/ ├── app/ │ ├── __init__.py │ └── essential.py ├── artifacts/ ├── prepare.py ├── pyproject.toml └── necessities.txt |
Subsequent, create a necessities.txt file and add the next dependencies:
|
fastapi[standard] scikit–study joblib numpy |
These packages will likely be used to construct and run the API, prepare the Scikit-learn mannequin, save the educated mannequin, and deal with numerical enter knowledge.
As soon as the file is prepared, set up the dependencies with:
|
pip set up –r necessities.txt |
At this level, the challenge skeleton is prepared, and you may transfer on to coaching your first Scikit-learn mannequin.
2. Coaching the Machine Studying Mannequin
On this part, you’ll prepare a easy Scikit-learn classification mannequin utilizing the built-in breast most cancers dataset.
The script hundreds the dataset, splits it into coaching and testing units, trains a RandomForestClassifier, evaluates its accuracy, and saves all the pieces wanted for inference right into a .joblib file contained in the artifacts folder.
Create a prepare.py file with the next code:
|
1 2 3 4 5 6 7 8 9 10 11 12 13 14 15 16 17 18 19 20 21 22 23 24 25 26 27 28 29 30 31 32 33 34 35 36 37 38 39 40 41 42 43 44 45 46 |
from pathlib import Path import joblib from sklearn.datasets import load_breast_cancer from sklearn.ensemble import RandomForestClassifier from sklearn.metrics import accuracy_score from sklearn.model_selection import train_test_split
def essential(): knowledge = load_breast_cancer() X = knowledge.knowledge y = knowledge.goal
X_train, X_test, y_train, y_test = train_test_split( X, y, test_size=0.2, random_state=42, stratify=y, )
mannequin = RandomForestClassifier( n_estimators=200, random_state=42, ) mannequin.match(X_train, y_train)
predictions = mannequin.predict(X_test) accuracy = accuracy_score(y_test, predictions)
artifact = { “mannequin”: mannequin, “target_names”: knowledge.target_names.tolist(), “feature_names”: knowledge.feature_names, }
output_path = Path(“artifacts/breast_cancer_model.joblib”) output_path.mum or dad.mkdir(mother and father=True, exist_ok=True) joblib.dump(artifact, output_path)
print(f“Mannequin saved to: {output_path}”) print(f“Take a look at accuracy: {accuracy:.4f}”)
if __name__ == “__main__”: essential() |
As soon as the file is prepared, run the coaching script out of your terminal:
You need to see output much like this:
|
Mannequin saved to: artifacts/breast_cancer_model.joblib Take a look at accuracy: 0.9561 |
This implies the mannequin was educated efficiently, evaluated on the take a look at cut up, and saved for later use within the FastAPI software.
3. Constructing the FastAPI Server
Now that the mannequin has been educated and saved, the following step is to construct a FastAPI server that hundreds the saved mannequin and serves predictions via an API.
This software hundreds the mannequin as soon as when the server begins, offers a easy well being verify endpoint, and exposes a /predict route that accepts characteristic values and returns each the expected class and sophistication possibilities.
Create app/essential.py with the next code:
|
1 2 3 4 5 6 7 8 9 10 11 12 13 14 15 16 17 18 19 20 21 22 23 24 25 26 27 28 29 30 31 32 33 34 35 36 37 38 39 40 41 42 43 44 45 46 47 48 49 50 51 52 53 54 55 56 57 58 59 60 61 62 63 64 65 66 67 68 69 70 71 72 73 74 75 76 77 78 79 80 81 82 83 84 85 86 87 88 89 90 91 92 93 94 95 96 97 98 99 100 101 102 103 104 105 106 107 108 109 110 111 112 113 114 115 116 117 118 119 |
from pathlib import Path import joblib import numpy as np from fastapi import FastAPI, HTTPException from pydantic import BaseModel
ARTIFACT_PATH = Path(“artifacts/breast_cancer_model.joblib”)
app = FastAPI( title=“Breast Most cancers Prediction API”, model=“1.0.0”, description=“A FastAPI server for serving a scikit-learn breast most cancers classifier”, )
class PredictionRequest(BaseModel): mean_radius: float mean_texture: float mean_perimeter: float mean_area: float mean_smoothness: float mean_compactness: float mean_concavity: float mean_concave_points: float mean_symmetry: float mean_fractal_dimension: float radius_error: float texture_error: float perimeter_error: float area_error: float smoothness_error: float compactness_error: float concavity_error: float concave_points_error: float symmetry_error: float fractal_dimension_error: float worst_radius: float worst_texture: float worst_perimeter: float worst_area: float worst_smoothness: float worst_compactness: float worst_concavity: float worst_concave_points: float worst_symmetry: float worst_fractal_dimension: float
@app.on_event(“startup”) def load_model(): if not ARTIFACT_PATH.exists(): elevate RuntimeError( f“Mannequin file not discovered at {ARTIFACT_PATH}. Run `python prepare.py` first.” )
artifact = joblib.load(ARTIFACT_PATH) app.state.mannequin = artifact[“model”] app.state.target_names = artifact[“target_names”]
@app.get(“/well being”) def well being(): return {“standing”: “okay”}
@app.put up(“/predict”) def predict(request: PredictionRequest): strive: options = np.array([[ request.mean_radius, request.mean_texture, request.mean_perimeter, request.mean_area, request.mean_smoothness, request.mean_compactness, request.mean_concavity, request.mean_concave_points, request.mean_symmetry, request.mean_fractal_dimension, request.radius_error, request.texture_error, request.perimeter_error, request.area_error, request.smoothness_error, request.compactness_error, request.concavity_error, request.concave_points_error, request.symmetry_error, request.fractal_dimension_error, request.worst_radius, request.worst_texture, request.worst_perimeter, request.worst_area, request.worst_smoothness, request.worst_compactness, request.worst_concavity, request.worst_concave_points, request.worst_symmetry, request.worst_fractal_dimension, ]])
mannequin = app.state.mannequin target_names = app.state.target_names
prediction_id = int(mannequin.predict(options)[0]) possibilities = mannequin.predict_proba(options)[0]
return { “prediction_id”: prediction_id, “prediction_label”: target_names[prediction_id], “possibilities”: { target_names[i]: float(spherical(possibilities[i], 6)) for i in vary(len(target_names)) } }
besides Exception as e: elevate HTTPException(status_code=500, element=str(e)) |
This FastAPI app does three helpful issues.
It hundreds the educated mannequin as soon as throughout startup, exposes a /well being endpoint so you possibly can rapidly verify whether or not the server is operating, and offers a /predict endpoint that accepts enter options and returns an inference end result. This makes it straightforward to show your Scikit-learn mannequin right into a reusable API that different purposes or companies can name.
4. Testing the Mannequin Inference Server Domestically
With the FastAPI app prepared, the following step is to run it domestically and take a look at whether or not the prediction endpoint works as anticipated. FastAPI makes this straightforward as a result of it routinely detects your software, begins a neighborhood improvement server, and offers built-in interactive API documentation that you need to use instantly from the browser.
Begin the server with:
As soon as the server begins, FastAPI will serve the API domestically, often on port 8000.
FastAPI will serve the API domestically
Subsequent, open the interactive API docs in your browser:
|
http://127.0.0.1:8000/docs |
Contained in the docs web page, you possibly can take a look at the /predict endpoint instantly. Increase the endpoint, click on Strive it out, paste within the enter values, and execute the request.
You may as well take a look at the API from the terminal utilizing curl:
|
1 2 3 4 5 6 7 8 9 10 11 12 13 14 15 16 17 18 19 20 21 22 23 24 25 26 27 28 29 30 31 32 33 34 |
curl –X POST “http://127.0.0.1:8000/predict” –H “Content material-Sort: software/json” –d ‘{ “mean_radius”: 17.99, “mean_texture”: 10.38, “mean_perimeter”: 122.8, “mean_area”: 1001.0, “mean_smoothness”: 0.1184, “mean_compactness”: 0.2776, “mean_concavity”: 0.3001, “mean_concave_points”: 0.1471, “mean_symmetry”: 0.2419, “mean_fractal_dimension”: 0.07871, “radius_error”: 1.095, “texture_error”: 0.9053, “perimeter_error”: 8.589, “area_error”: 153.4, “smoothness_error”: 0.006399, “compactness_error”: 0.04904, “concavity_error”: 0.05373, “concave_points_error”: 0.01587, “symmetry_error”: 0.03003, “fractal_dimension_error”: 0.006193, “worst_radius”: 25.38, “worst_texture”: 17.33, “worst_perimeter”: 184.6, “worst_area”: 2019.0, “worst_smoothness”: 0.1622, “worst_compactness”: 0.6656, “worst_concavity”: 0.7119, “worst_concave_points”: 0.2654, “worst_symmetry”: 0.4601, “worst_fractal_dimension”: 0.1189 }’ |
The response will likely be returned as JSON, together with the expected class ID, the expected label, and the likelihood scores for every class.
This confirms that the inference server is working domestically and is able to be deployed.
5. Deploying the API to the Cloud
After you have completed testing the API domestically, you possibly can cease the event server by urgent CTRL + C. The following step is to deploy the applying to FastAPI Cloud. FastAPI Cloud helps deployment instantly from the CLI, and the usual movement is fastapi login adopted by fastapi deploy.
Log in with:
After logging in, deploy the app with:
In the course of the first deployment, the CLI can information you thru setup, reminiscent of choosing or making a crew and selecting whether or not to create a brand new app or hyperlink to an current one.
FastAPI Cloud then packages and uploads your code, installs dependencies within the cloud, deploys the applying, and verifies that deployment accomplished efficiently. After the primary deploy, it additionally creates a .fastapicloud listing in your challenge so later deployments are less complicated.
A profitable deployment will finish with output much like this:
|
✅ Prepared the hen! 🐔 Your app is prepared at https://sklearn-fastapi-app.fastapicloud.dev |
As soon as the app is reside, open the deployed docs web page in your browser to verify that the endpoints are working.
You may as well take a look at the deployed API from the terminal by changing the native URL along with your cloud URL.
Lastly, you possibly can go to the FastAPI Cloud dashboard, click on your deployed app, and verify the logs to observe builds, startup habits, and runtime points.
What to Do Subsequent
You now have a whole end-to-end workflow in place: a educated machine studying mannequin, a FastAPI software for inference, native testing, and a deployment on FastAPI Cloud.
To take this additional and attain an actual manufacturing degree, the following step is to make the API safe, examined, monitored, and in a position to deal with real-world visitors reliably at scale.
- Safe the API by including API key safety or a stronger authentication layer.
- Strengthen error dealing with so failures are clear, constant, and simpler to troubleshoot.
- Enhance efficiency so the API can reply effectively beneath heavier visitors.
- Take a look at extra deeply with unit checks, endpoint checks, and cargo testing.
- Add monitoring to trace uptime, latency, errors, and general utilization.
- Refine deployment workflows with versioning, rollback plans, and safer releases.
That’s what turns a working deployed API into one that may function extra reliably in the true world.


