


Picture by Editor
# Introduction
Likelihood is, you have already got the sensation that the brand new, agent-first synthetic intelligence period is right here, with builders resorting to new instruments that, as an alternative of simply producing code reactively, genuinely perceive the distinctive processes behind code technology.
Google Antigravity has so much to say on this matter. This software holds the important thing to constructing extremely customizable brokers. This text unveils a part of its potential by demystifying three cornerstone ideas: guidelines, abilities, and workflows.
On this article, you will discover ways to hyperlink these key ideas collectively to construct extra sturdy brokers and highly effective automated pipelines. Particularly, we are going to carry out a step-by-step course of to arrange a code high quality assurance (QA) agent workflow, primarily based on specified guidelines and abilities. Off we go!
# Understanding the Three Core Ideas
Earlier than getting our fingers soiled, it’s handy to interrupt down the next three components belonging to the Google Antigravity ecosystem:
- Rule: These are the baseline constraints that dictate the agent’s conduct, in addition to the right way to adapt it to our stack and match our model. They’re saved as markdown recordsdata.
- Ability: Think about abilities as a reusable bundle containing information that instructs the agent on the right way to handle a concrete process. They’re allotted in a devoted folder that accommodates a file named
SKILL.md. - Workflow: These are the orchestrators that put all of it collectively. Workflows are invoked through the use of command-like directions preceded by a ahead slash, e.g.
/deploy. Merely put, workflows information the agent via an motion plan or trajectory that’s well-structured and consists of a number of steps. That is the important thing to automating repetitive duties with out lack of precision.
# Taking Motion
Let’s transfer on to our sensible instance. We are going to see the right way to configure Antigravity to assessment Python code, apply right formatting, and generate checks — all with out the necessity for added third-party instruments.
Earlier than taking these steps, ensure you have downloaded and put in Google Antigravity in your pc first.
As soon as put in, open the desktop software and open your Python mission folder — in case you are new to the software, you can be requested to outline a folder in your pc file system to behave because the mission folder. Regardless, the way in which so as to add a manually created folder into Antigravity is thru the “File >> Add Folder to Workspace…” choice within the higher menu toolbar.
Say you will have a brand new, empty workspace folder. Within the root of the mission listing (left-hand facet), create a brand new folder and provides it the title .brokers. Inside this folder, we are going to create two subfolders: one referred to as guidelines and one named abilities. You could guess that these two are the place we are going to outline the 2 pillars for our agent’s conduct: guidelines and abilities.
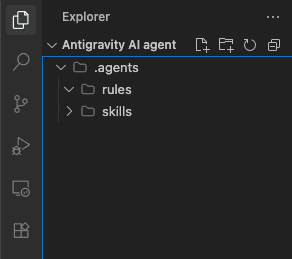
The mission folder hierarchy | Picture by Writer
Let’s outline a rule first, containing our baseline constraints that may make sure the agent’s adherence to Python formatting requirements. We do not want verbose syntax to do that: in Antigravity, we outline it utilizing clear directions in pure language. Contained in the guidelines subfolder, you will create a file named python-style.md and paste the next content material:
# Python Model Rule
All the time use PEP 8 requirements. When offering or refactoring code, assume we're utilizing `black` for formatting. Maintain dependencies strictly to free, open-source libraries to make sure our mission stays free-friendly.
If you wish to nail it, go to the agent customizations panel that prompts on the right-hand facet of the editor, open it, and discover and choose the rule we simply outlined:

Customizing the activation of agent guidelines | Picture by Writer
Customization choices will seem above the file we simply edited. Set the activation mannequin to “glob” and specify this glob sample: **/*.py, as proven beneath:
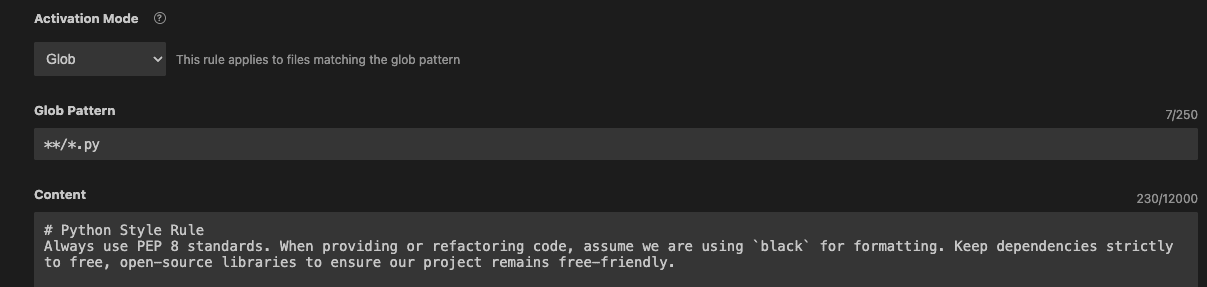
Setting the glob activation mode | Picture by Writer
With this, you simply ensured the agent that can be launched later all the time applies the rule outlined once we are particularly engaged on Python scripts.
Subsequent, it is time to outline (or “educate”) the agent some abilities. That would be the ability of performing sturdy checks on Python code — one thing extraordinarily helpful in right now’s demanding software program improvement panorama. Contained in the abilities subfolder, we are going to create one other folder with the title pytest-generator. Create a SKILL.md file inside it, with the next content material:
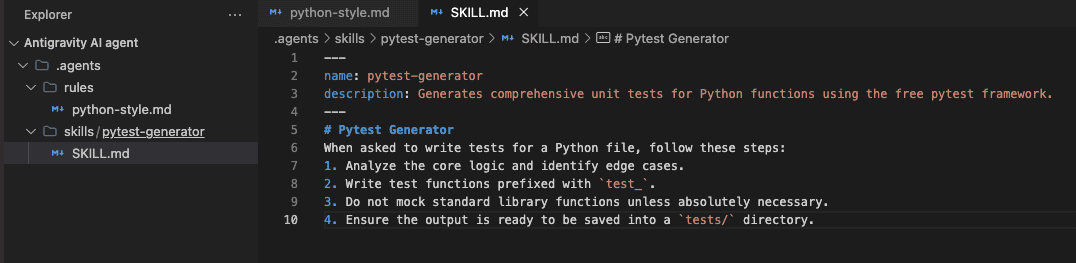
Defining agent abilities throughout the workspace | Picture by Writer
Now it is time to put all of it collectively and launch our agent, however not with out having inside our mission workspace an instance Python file containing “poor-quality” code first to strive all of it on. If you have no, strive creating a brand new .py file, calling it one thing like flawed_division.py within the root listing, and add this code:
def divide_numbers( x,y ):
  return x/y
You could have observed this Python code is deliberately messy and flawed. Let’s have a look at what our agent can do about it. Go to the customization panel on the right-hand facet, and this time give attention to the “Workflows” navigation pane. Click on “+Workspace” to create a brand new workflow we are going to name qa-check, with this content material:
# Title: Python QA Verify
# Description: Automates code assessment and check technology for Python recordsdata.

Step 1: Evaluate the at the moment open Python file for bugs and elegance points, adhering to our Python Model Rule.
Step 2: Refactor any inefficient code.
Step 3: Name the `pytest-generator` ability to jot down complete unit checks for the refactored code.
Step 4: Output the ultimate check code and recommend operating `pytest` within the terminal.
All these items, when glued collectively by the agent, will rework the event loop as a complete. With the messy Python file nonetheless open within the workspace, we are going to put our agent to work by clicking the agent icon within the right-hand facet panel, typing the qa-check command, and hitting enter to run the agent:

Invoking the QA workflow through the agent console | Picture by Writer
After execution, the agent may have revised the code and robotically recommended a brand new model within the Python file, as proven beneath:
The refactored code recommended by the agent | Picture by Writer
However that is not all: the agent additionally comes with the excellent high quality verify we had been on the lookout for by producing quite a lot of code excerpts you should use to run various kinds of checks utilizing pytest. For the sake of illustration, that is what a few of these checks may appear to be:
import pytest
from flawed_division import divide_numbers

def test_divide_numbers_normal():
    assert divide_numbers(10, 2) == 5.0
    assert divide_numbers(9, 3) == 3.0

def test_divide_numbers_negative():
    assert divide_numbers(-10, 2) == -5.0
    assert divide_numbers(10, -2) == -5.0
    assert divide_numbers(-10, -2) == 5.0

def test_divide_numbers_float():
    assert divide_numbers(5.0, 2.0) == 2.5

def test_divide_numbers_zero_numerator():
    assert divide_numbers(0, 5) == 0.0

def test_divide_numbers_zero_denominator():
    with pytest.raises(ValueError, match="Can't divide by zero"):
        divide_numbers(10, 0)
All this sequential course of carried out by the agent has consisted of first analyzing the code underneath the constraints we outlined via guidelines, then autonomously calling the newly outlined ability to provide a complete testing technique tailor-made to our codebase.
# Wrapping Up
Wanting again, on this article, we have now proven the right way to mix three key components of Google Antigravity — guidelines, abilities, and workflows — to show generic brokers into specialised, sturdy, and environment friendly workmates. We illustrated the right way to make an agent specialised in appropriately formatting messy code and defining QA checks.
Iván Palomares Carrascosa is a pacesetter, author, speaker, and adviser in AI, machine studying, deep studying & LLMs. He trains and guides others in harnessing AI in the true world.
Picture by Editor
# Introduction
Likelihood is, you have already got the sensation that the brand new, agent-first synthetic intelligence period is right here, with builders resorting to new instruments that, as an alternative of simply producing code reactively, genuinely perceive the distinctive processes behind code technology.
Google Antigravity has so much to say on this matter. This software holds the important thing to constructing extremely customizable brokers. This text unveils a part of its potential by demystifying three cornerstone ideas: guidelines, abilities, and workflows.
On this article, you will discover ways to hyperlink these key ideas collectively to construct extra sturdy brokers and highly effective automated pipelines. Particularly, we are going to carry out a step-by-step course of to arrange a code high quality assurance (QA) agent workflow, primarily based on specified guidelines and abilities. Off we go!
# Understanding the Three Core Ideas
Earlier than getting our fingers soiled, it’s handy to interrupt down the next three components belonging to the Google Antigravity ecosystem:
- Rule: These are the baseline constraints that dictate the agent’s conduct, in addition to the right way to adapt it to our stack and match our model. They’re saved as markdown recordsdata.
- Ability: Think about abilities as a reusable bundle containing information that instructs the agent on the right way to handle a concrete process. They’re allotted in a devoted folder that accommodates a file named
SKILL.md. - Workflow: These are the orchestrators that put all of it collectively. Workflows are invoked through the use of command-like directions preceded by a ahead slash, e.g.
/deploy. Merely put, workflows information the agent via an motion plan or trajectory that’s well-structured and consists of a number of steps. That is the important thing to automating repetitive duties with out lack of precision.
# Taking Motion
Let’s transfer on to our sensible instance. We are going to see the right way to configure Antigravity to assessment Python code, apply right formatting, and generate checks — all with out the necessity for added third-party instruments.
Earlier than taking these steps, ensure you have downloaded and put in Google Antigravity in your pc first.
As soon as put in, open the desktop software and open your Python mission folder — in case you are new to the software, you can be requested to outline a folder in your pc file system to behave because the mission folder. Regardless, the way in which so as to add a manually created folder into Antigravity is thru the “File >> Add Folder to Workspace…” choice within the higher menu toolbar.
Say you will have a brand new, empty workspace folder. Within the root of the mission listing (left-hand facet), create a brand new folder and provides it the title .brokers. Inside this folder, we are going to create two subfolders: one referred to as guidelines and one named abilities. You could guess that these two are the place we are going to outline the 2 pillars for our agent’s conduct: guidelines and abilities.
The mission folder hierarchy | Picture by Writer
Let’s outline a rule first, containing our baseline constraints that may make sure the agent’s adherence to Python formatting requirements. We do not want verbose syntax to do that: in Antigravity, we outline it utilizing clear directions in pure language. Contained in the guidelines subfolder, you will create a file named python-style.md and paste the next content material:
# Python Model Rule
All the time use PEP 8 requirements. When offering or refactoring code, assume we're utilizing `black` for formatting. Maintain dependencies strictly to free, open-source libraries to make sure our mission stays free-friendly.
If you wish to nail it, go to the agent customizations panel that prompts on the right-hand facet of the editor, open it, and discover and choose the rule we simply outlined:
Customizing the activation of agent guidelines | Picture by Writer
Customization choices will seem above the file we simply edited. Set the activation mannequin to “glob” and specify this glob sample: **/*.py, as proven beneath:
Setting the glob activation mode | Picture by Writer
With this, you simply ensured the agent that can be launched later all the time applies the rule outlined once we are particularly engaged on Python scripts.
Subsequent, it is time to outline (or “educate”) the agent some abilities. That would be the ability of performing sturdy checks on Python code — one thing extraordinarily helpful in right now’s demanding software program improvement panorama. Contained in the abilities subfolder, we are going to create one other folder with the title pytest-generator. Create a SKILL.md file inside it, with the next content material:
Defining agent abilities throughout the workspace | Picture by Writer
Now it is time to put all of it collectively and launch our agent, however not with out having inside our mission workspace an instance Python file containing “poor-quality” code first to strive all of it on. If you have no, strive creating a brand new .py file, calling it one thing like flawed_division.py within the root listing, and add this code:
def divide_numbers( x,y ):
  return x/y
You could have observed this Python code is deliberately messy and flawed. Let’s have a look at what our agent can do about it. Go to the customization panel on the right-hand facet, and this time give attention to the “Workflows” navigation pane. Click on “+Workspace” to create a brand new workflow we are going to name qa-check, with this content material:
# Title: Python QA Verify
# Description: Automates code assessment and check technology for Python recordsdata.

Step 1: Evaluate the at the moment open Python file for bugs and elegance points, adhering to our Python Model Rule.
Step 2: Refactor any inefficient code.
Step 3: Name the `pytest-generator` ability to jot down complete unit checks for the refactored code.
Step 4: Output the ultimate check code and recommend operating `pytest` within the terminal.
All these items, when glued collectively by the agent, will rework the event loop as a complete. With the messy Python file nonetheless open within the workspace, we are going to put our agent to work by clicking the agent icon within the right-hand facet panel, typing the qa-check command, and hitting enter to run the agent:
Invoking the QA workflow through the agent console | Picture by Writer
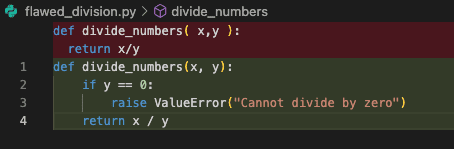
After execution, the agent may have revised the code and robotically recommended a brand new model within the Python file, as proven beneath:
The refactored code recommended by the agent | Picture by Writer
However that is not all: the agent additionally comes with the excellent high quality verify we had been on the lookout for by producing quite a lot of code excerpts you should use to run various kinds of checks utilizing pytest. For the sake of illustration, that is what a few of these checks may appear to be:
import pytest
from flawed_division import divide_numbers

def test_divide_numbers_normal():
    assert divide_numbers(10, 2) == 5.0
    assert divide_numbers(9, 3) == 3.0

def test_divide_numbers_negative():
    assert divide_numbers(-10, 2) == -5.0
    assert divide_numbers(10, -2) == -5.0
    assert divide_numbers(-10, -2) == 5.0

def test_divide_numbers_float():
    assert divide_numbers(5.0, 2.0) == 2.5

def test_divide_numbers_zero_numerator():
    assert divide_numbers(0, 5) == 0.0

def test_divide_numbers_zero_denominator():
    with pytest.raises(ValueError, match="Can't divide by zero"):
        divide_numbers(10, 0)
All this sequential course of carried out by the agent has consisted of first analyzing the code underneath the constraints we outlined via guidelines, then autonomously calling the newly outlined ability to provide a complete testing technique tailor-made to our codebase.
# Wrapping Up
Wanting again, on this article, we have now proven the right way to mix three key components of Google Antigravity — guidelines, abilities, and workflows — to show generic brokers into specialised, sturdy, and environment friendly workmates. We illustrated the right way to make an agent specialised in appropriately formatting messy code and defining QA checks.
Iván Palomares Carrascosa is a pacesetter, author, speaker, and adviser in AI, machine studying, deep studying & LLMs. He trains and guides others in harnessing AI in the true world.


