


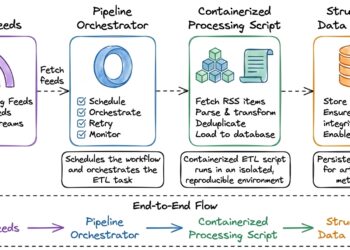
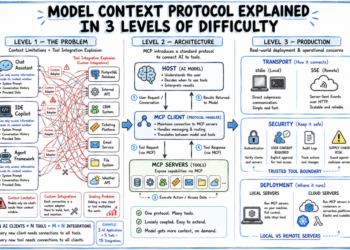
Optimizing Multimodal Brokers
Multimodal AI brokers, these that may course of textual content and pictures (or different media), are quickly getting into real-world domains like autonomous driving, healthcare, and robotics. In these settings, we’ve got historically used imaginative and prescient fashions like CNNs; within the post-GPT period, we are able to use imaginative and prescient and multimodal language fashions that leverage human directions within the type of prompts, moderately than task-oriented, extremely particular imaginative and prescient fashions.
Nonetheless, guaranteeing good outcomes from the fashions requires efficient directions, or, extra generally, immediate engineering. Current immediate engineering strategies rely closely on trial and error, and that is usually exacerbated by the complexity and better value of tokens when working throughout non-text modalities akin to photographs. Computerized immediate optimization is a current development within the discipline that systematically tunes prompts to provide extra correct, constant outputs.
For instance, a self-driving automotive notion system would possibly use a vision-language mannequin to reply questions on highway photographs. A poorly phrased immediate can result in misunderstandings or errors with severe penalties. As an alternative of fine-tuning and reinforcement studying, we are able to use one other multimodal mannequin with reasoning capabilities to be taught and adapt its prompts.

Though these automated strategies may be utilized to text-based brokers, they’re usually not effectively documented for extra complicated, real-world purposes past a primary toy dataset, akin to handwriting or picture classification. To finest reveal how these ideas work in a extra complicated, dynamic, and data-intensive setting, we are going to stroll via an instance utilizing a self-driving automotive agent.
What Is Agent Optimization?
Agent optimization is a part of automated immediate engineering, but it surely includes working with varied components of the agent, akin to multi-prompts, instrument calling, RAG, agent structure, and varied modalities. There are a selection of analysis initiatives and libraries, akin to GEPA; nonetheless, many of those instruments don’t present end-to-end help for tracing, evaluating, and managing datasets, akin to photographs.
For this walk-through, we will likely be utilizing the Opik Agent Optimizer SDK (opik-optimizer), which is an open-sourced agent optimization toolkit that automates this course of utilizing LLMs internally, together with optimization algorithms like GEPA and quite a lot of their very own, akin to HRPO, for varied use circumstances, so you’ll be able to iteratively enhance prompts with out guide trial-and-error.
How Can LLMs Optimize Prompts?
Primarily, an LLM can “act as” a immediate engineer and rewrite a given immediate. We begin by taking the standard method, as a immediate engineer would with trial and error, and ask a small agent to evaluation its work throughout a couple of examples, repair its errors, and create a brand new immediate.
Meta Prompting is a basic instance of utilizing chain-of-thought reasoning (CoT), akin to “clarify the explanation why you gave me this immediate”, throughout its new immediate technology course of, and we hold iterating on this throughout a number of rounds of immediate technology. Beneath is an instance of an LLM-based meta-prompting optimizer adjusting the immediate and producing new candidates.

Within the toolkit, there’s a meta-prompt-based optimizer known as metaprompter, and we are able to reveal how the optimization works:
- It begins with an preliminary ChatPrompt, an OpenAI-style chat immediate object with system and person prompts,
- a dataset (of enter and reply examples),
- and a metric (reward sign) to optimize towards, which may be an LLMaaJ (LLM-as-a-judge) and even less complicated heuristic metrics, akin to equal comparability of anticipated outputs within the dataset to outputs from the mannequin.
Opik then makes use of varied algorithms, together with LLMs, to iteratively mutate the immediate and consider efficiency, mechanically monitoring outcomes. Primarily performing as our personal very machine-driven immediate engineer!
Getting Began
On this walkthrough, we wish to use a small dataset of self-driving automotive dashcam photographs and tune the prompts utilizing automated immediate optimization with a multi-modal agent that can detect hazards.
We have to arrange the environment and set up the toolkit to get going. First, you will want an open-source Opik occasion, both within the cloud or regionally, to log traces, handle datasets, and retailer optimization outcomes. You’ll be able to go to the repository and run the Docker begin command to run the Opik platform or arrange a free account on their web site.
As soon as arrange, you’ll want Python (3.10 or increased) and some libraries. First, set up the opik-optimizer package deal; it is going to additionally set up the opik core package deal, which handles datasets and analysis.
Set up and configure utilizing uv (advisable):
# set up with venv and py model
uv venv .venv --python 3.11

# set up optimizer package deal
uv pip set up opik-optimizer

# post-install configure SDK
opik configure
Or alternatively, set up and configure utilizing pip:
# Setup venv
python -m venv .venv

# load venv
supply .venv/bin/activate

# set up optimizer package deal
pip set up opik-optimizer

# post-install configure SDK
opik configure
You’ll additionally want API keys for any LLM fashions you intend to make use of. The SDK makes use of LiteLLM, so you’ll be able to combine suppliers, see right here for a full record of fashions, and skim their docs for different integrations like ollama and vLLM if you wish to run fashions regionally.
In our instance, we will likely be utilizing OpenAI fashions, so you could set your keys in your setting. You alter this step as wanted for loading the API keys on your mannequin:
export OPENAI_API_KEY="sk-…"Now that we’ve got our Opik setting arrange and our keys configured to entry LLM fashions for optimization and analysis, we are able to get to work on our datasets to tune our agent.
Working with Datasets To Tune the Agent
Earlier than we are able to begin with prompts and fashions, we’d like a dataset. To tune an AI agent (and even simply to optimize a easy immediate), we’d like examples that function our “preferences” for the outcomes we wish to obtain. You’ll usually have a “golden” dataset, which, on your AI agent, would come with instance inputs and output pairs that you just preserve because the prime examples and consider your agent towards.
For this instance challenge, we are going to use an off-the-shelf dataset for self-driving vehicles that’s already arrange as a demo dataset within the optimizer SDK. The dataset incorporates dashcam photographs and human-labeled hazards. Our aim is to make use of a really primary immediate and have the optimizer “uncover” the optimum immediate by reviewing the pictures and the check outputs it is going to run.
The dataset, DHPR (Driving Hazard Prediction and Reasoning), is accessible on Hugging Face and is already mapped within the SDK because the driving_hazard dataset (this dataset is launched underneath BSD 3-Clause license). The interior mapping within the SDK handles Hugging Face conversions, picture resizing, and compression, together with PNG-to-JPEG conversions and conversions to an Opik-compatible dataset. The SDK consists of helper utilities for those who want to use your personal multimodal dataset.

The DHPR dataset features a few fields that we are going to use to floor our agent’s habits towards human preferences throughout our optimization course of. Here’s a breakdown of what’s within the dataset:
query, which they requested the human annotator, “Primarily based on my dashcam picture, what’s the potential hazard?”hazard, which is the response from the human labelingbounding_boxthat has the hazard marked and may be overlaid on the pictureplausible_speedis the annotator’s guestimate of the automotive’s pace from the predefined set [10, 30, 50+].image_sourcemetadata on the place the supply photographs have been recorded.
Now, let’s begin with a brand new Python file, optimize_multimodal.py, and begin with our dataset to coach and validate our optimization course of with:
from opik_optimizer.datasets import driving_hazard
dataset = driving_hazard(rely=20)
validation_dataset = driving_hazard(rely=5)
This code, when executed, will make sure the Hugging Face dataset is downloaded and added to your Opik platform UI as a dataset we are able to optimize or check with. We’ll then cross the variables dataset and validation_dataset to the optimization steps within the code in a while. You’ll notice we’re setting the rely values to low numbers, 20 and 5, to load a small pattern as wanted to keep away from processing your entire dataset for our walk-through, which might be resource-intensive.
Once you run a full optimization course of in a reside setting, it is best to goal to make use of as a lot of the dataset as doable. It’s good follow to start out small and scale up, as diagnosing long-running optimizations may be problematic and resource-intensive.
We additionally configured the non-compulsory validation_dataset, which is used to check our optimization initially and finish on a hold-out set to make sure the recorded enchancment is validated on unseen information. Out of the field, the optimizers’ pre-configured datasets all include pre-set splits, which you’ll be able to entry from the cut up argument. See examples as follows:
# instance a) driving_hazard pre-configured splits
from opik_optimizer.datasets import driving_hazard
trainset = driving_hazard(cut up=practice)
valset = driving_hazard(cut up=validation)
testset = driving_hazard(cut up=check)

# instance b) gsm84k math dataset pre-configured splits
from opik_optimizer.datasets import gsm8k
trainset = gsm8k(cut up=practice)
valset = gsm8k(cut up=validation)
testset = gsm8k(cut up=check)
The splits additionally guarantee there’s no overlapping information, because the dataset is shuffled within the right order and cut up into 3 components. We keep away from utilizing these splits to keep away from having to make use of very massive datasets and runs after we are getting began.
Let’s go forward and run our code optimize_multimodal.py with simply the driving hazard dataset. The dataset will likely be loaded into Opik and may be seen in our dashboard (determine 4 under) underneath “driving_hazard_train_20”.

With our dataset loaded in Opik we are able to additionally load the dataset within the Opik playground, which is a pleasant and simple approach to see how varied prompts would behave and check them towards a easy immediate akin to “Determine the hazards on this picture.”

As you’ll be able to see from the instance (determine 4 above), we are able to use the playground to check prompts for our agent fairly rapidly. That is in all probability the same old course of we might use for guide immediate engineering: adjusting the immediate in a playground-like setting and simulating how varied adjustments to the immediate would have an effect on the mannequin’s outputs.
For some eventualities, this might be ample with some automated scoring and utilizing instinct to regulate prompts, and you may see how bringing the prevailing immediate optimization course of right into a extra visible and systematic course of, how delicate adjustments can simply be examined towards our golden dataset (our pattern of 20 for now)
Defining Analysis Metrics To Optimize With
We’ll proceed to outline our analysis metrics designed to let the optimizer know what adjustments are working and which aren’t. We’d like a approach to sign the optimizer about what’s working and what’s failing. For this, we are going to use an analysis metric because the “reward”; it will likely be a easy rating that the optimizer makes use of to resolve which immediate adjustments to make.
These analysis metrics may be easy (e.g., Equals) or extra complicated (e.g., LLM-as-a-judge). Since Opik is a totally open-source analysis suite, you should utilize quite a lot of varied metrics, which you’ll be able to discover right here to search out out extra.
Logically, you’ll assume that after we examine the dataset floor reality (a) to the mannequin output (b), we might do a easy equals comparability metric like is (a == b), which can return a boolean true or false. Utilizing a direct comparability metric may be dangerous to the optimizer, because it makes the method a lot tougher and will not yield the precise reply proper from the beginning (or all through the optimization course of).
One of many human-annotated examples from the dataset we are attempting to get the optimizer to match, you’ll be able to see how getting the LLM to create precisely the identical output blindly might be difficult:
Entity #1 brakes his automotive in entrance of Entity #2. Seeing that Entity #2 additionally pulled his brakes. At a pace of 45 km/h, I am unable to cease my automotive in time and hit Entity #2.To help the hill-climbing wanted for the optimizer, we are going to use a comparability metric that gives an approximation rating as a proportion on a scale of 0.0 to 1.0. For this situation, we are going to use the Levenshtein ratio, a easy math-based measure of how intently the characters and phrases within the output match these within the floor reality dataset. With our closeness to instance metric, LR (Levenshtein ratio) a physique of textual content with a couple of characters off may yield a rating for instance of 98% (0.98), as they’re very comparable (determine 6 under).

In our Python script, we outline this tradition metric as a perform alongside the enter and output variables from our dataset. In follow we are going to outline the mapping between the dataset hazard and the output llm_output, in addition to the scoring perform to be handed to the optimizer. There are extra metric examples within the documentation, however for now, we are going to use the next setup in our code after the dataset creation:
from opik.analysis.metrics import LevenshteinRatio
from opik.analysis.metrics.score_result import ScoreResult

def levenshtein_ratio(
    dataset_item: dict[str, Any],
    llm_output: str
) -> ScoreResult:
    metric = LevenshteinRatio()
    metric_score = metric.rating(
        reference=dataset_item["hazard"], output=llm_output
    )
    return ScoreResult(
        worth=metric_score.worth,
        identify=metric_score.identify,
        cause=f"Levenshtein ratio between `{dataset_item['hazard']}` and `{llm_output}` is `{metric_score.worth}`.",
    )
Setting Up Our Base Agent & Immediate
Right here we’re configuring the agent’s start line. On this case, we assume we have already got an agent and a handwritten immediate. When you have been optimizing your personal agent, you’ll exchange these placeholders. We begin by importing the ChatPrompt class, which permits us to configure the agent as a easy chat immediate. The optimizer SDK handles inputs through the ChatPrompt, and you may lengthen this with instrument/perform calling and extra multi-prompt/agent eventualities, additionally on your personal use circumstances.
from opik_optimizer import ChatPrompt

# Outline the immediate to optimize
system_prompt = """You're an knowledgeable driving security assistant
specialised in hazard detection. Your job is to research dashcam
photographs and establish potential hazards {that a} driver ought to concentrate on.

For every picture:
1. Rigorously look at the visible scene
2. Determine any potential hazards (pedestrians, automobiles,
highway situations, obstacles, and so on.)
3. Assess the urgency and severity of every hazard
4. Present a transparent, particular description of the hazard

Be exact and actionable in your hazard descriptions.
Give attention to safety-critical info."""

# Map into an OpenAI-style chat immediate object
immediate = ChatPrompt(
    messages=[
        {"role": "system", "content": system_prompt},
        {
            "role": "user",
            "content": [
                {"type": "text", "text": "{question}"},
                {
                    "type": "image_url",
                    "image_url": {
                        "url": "{image}",
                    },
                },
            ],
        },
    ],
)
In our instance, we’ve got a system immediate and a person immediate, primarily based on the query {query}and the picture {picture} from the dataset we created earlier. We’re going to attempt to optimize the system immediate in order that the enter adjustments primarily based on every picture (as we noticed within the playground earlier). The fields within the parentheses, like {data_field}, are columns in our dataset that the SDK will mechanically map and in addition convert for issues like multi-modal photographs.
Loading and Wiring the Optimizers
The toolkit comes with a variety of optimizers, from easy meta-prompting, which makes use of chain-of-thought reasoning to replace prompts, to GEPA and extra superior reflective optimizers. On the time of this walk-through, the hierarchical reflective optimizer (HRPO) is the one we are going to use for instance functions, because it’s suited to complicated and ambiguous duties.
The HRPO optimization algorithm (determine 7 under) makes use of hierarchical root trigger evaluation to establish and deal with particular failure modes in your prompts. It analyzes analysis outcomes, identifies patterns in failures, and generates focused enhancements to systematically deal with every failure mode.

To date in our challenge, we’ve got arrange the bottom dataset, analysis metric, and immediate for our agent, however haven’t wired this as much as any optimizers. Let’s go forward and wire in HRPO into our challenge. We have to load our mannequin and configure any parameters, such because the mannequin we wish to use to run the optimizer on:
from opik_optimizer import HRPO

# Setup optimizer and configuration parameters
optimizer = HRPO(
  mannequin="openai/gpt-5.2."
  model_parameters={"temperature": 1}
}
There are extra parameters we are able to set, such because the variety of threads for multi-threading or the mannequin parameters handed on to the LLM calls, as we reveal by setting our temperatureworth.
It’s Time, Working The Optimizer
Now we’ve got every thing we’d like, together with our beginning agent, dataset, metric, and the optimizer. To execute the optimizer, we have to name the optimizer’s optimize_prompt perform and cross all elements, together with any extra parameters. So actually, at this stage, the optimizer and the optimize_prompt() perform, which when executed, will run the optimizer we configured (optimizer).
# Execute optimizer
optimization_result = optimizer.optimize_prompt(
  immediate=immediate, # our ChatPrompt
  dataset=dataset, # our Opik dataset
  validation_dataset=validation_dataset, # non-compulsory, hold-out check
  metric=levenshtein_ratio, # our customized metric
  max_trials=10, # non-compulsory, variety of runs
)

# Output and show outcomes
optimization_result.show()
You’ll discover some extra arguments we handed; the max_trials argument limits the variety of trials (optimization loops) the optimizer will run earlier than stopping. It’s best to begin with a low quantity, as some datasets and optimizer loops may be token-heavy, particularly with image-based runs, which might result in very lengthy runs and be time and cost-intensive. As soon as we’re proud of our setup, we are able to all the time come again and scale this up.
Let’s run our full script now and see the optimizer in motion. It’s finest to execute this in your terminal, however this must also work superb in a pocket book akin to Jupyter Notebooks:

The optimizer will run via 10 trials (optimization loops). On every loop, it is going to generate a quantity (okay) of failures to test, check, and develop new prompts for. At every trial (loop), the brand new candidate prompts are examined and evaluated, and one other trial begins. After a short time, we should always attain the top of our optimization loop; in our case, this occurs after 10 full trials, which mustn’t take greater than a minute to execute.
Congratulations, we optimized our multi-modal agent, and we are able to now take the brand new system immediate and apply it to the identical mannequin in manufacturing with improved accuracy. In a manufacturing situation, you’ll copy this into our codebase. To research our optimization run, we are able to see that the terminal and dashboard ought to present the brand new outcomes:

Primarily based on the outcomes, we are able to see that we’ve got gone from a baseline rating of 15% to 39% after 10 trials, a whoping 152% enchancment with a brand new immediate in underneath a minute. These outcomes are primarily based on our comparability metric, which the optimizer used as its sign: a comparability of the output vs. our anticipated output in our dataset.
Digging into our outcomes, a couple of key issues to notice:
- Throughout the trial runs the rating shoots up in a short time, then slowly normalizes. It’s best to improve the variety of trials, and we should always see whether or not it wants extra to find out the subsequent set of immediate enhancements.
- The rating will even be extra “unstable” and overfit with low samples of 20 and 5 for validation, so we needed to hold our check small; randomness will affect our scores massively. Once you re-run, strive utilizing the complete dataset or a bigger pattern (e.g., rely=50) and see how the scores are extra practical.
Total, as we scale this up, we have to give the optimizer extra information and extra time (sign) to “hill climb,” which might take a number of rounds.
On the finish of our optimization, our new and improved system immediate has now acknowledged that it must label varied interactions and that the output model must match. Right here is our last improved immediate after 10 trials:
You're an knowledgeable driving incident analyst specialised in collision-causal description.

Your job is to research dashcam photographs and write the more than likely collision-oriented causal narrative that matches reference-style solutions.

For every picture:
1. Determine the first interacting individuals and label them explicitly as "Entity #1", "Entity #2", and so on. (e.g., car, pedestrian, bike owner, impediment).
2. Describe the one most salient accident interplay as an specific causal chain utilizing entity labels: "Entity #X [action/failure] → [immediate consequence/path conflict] → [impact]".
3. Finish with a transparent affect consequence that MUST (a) use specific collision language AND (b) identify the entities concerned (e.g., "Entity #2 rear-ends Entity #1", "Entity #1 side-impacts Entity #2",
"Entity #1 strikes Entity #2").

Output necessities (important):
- Produce ONE brief, direct causal assertion (1–2 sentences).
- The assertion MUST embody: (i) not less than two entities by label, (ii) a concrete motion/failure-to-yield/encroachment, and (iii) an specific collision consequence naming the entities. If any of those
are lacking, the reply is invalid.
- Do NOT output a guidelines, a number of hazards, severity/urgency rankings, or common driving recommendation.
- Keep away from common danger dialogue (visibility, congestion, pedestrians) until it instantly helps the one causal chain culminating within the collision/affect.
- Give attention to the particular causal development culminating within the affect (even when partially inferred from context); don't describe a number of doable crashes-commit to the one more than likely one.
You’ll be able to seize the complete last code for the instance finish to finish as follows:
from typing import Any

from opik_optimizer.datasets import driving_hazard
from opik_optimizer import ChatPrompt, HRPO
from opik.analysis.metrics import LevenshteinRatio
from opik.analysis.metrics.score_result import ScoreResult

# Import the dataset
dataset = driving_hazard(rely=20)
validation_dataset = driving_hazard(cut up="check", rely=5)

# Outline the metric to optimize on
def levenshtein_ratio(dataset_item: dict[str, Any], llm_output: str) -> ScoreResult:
    metric = LevenshteinRatio()
    metric_score = metric.rating(reference=dataset_item["hazard"], output=llm_output)
    return ScoreResult(
        worth=metric_score.worth,
        identify=metric_score.identify,
        cause=f"Levenshtein ratio between `{dataset_item['hazard']}` and `{llm_output}` is `{metric_score.worth}`.",
    )

# Outline the immediate to optimize
system_prompt = """You're an knowledgeable driving security assistant specialised in hazard detection.

Your job is to research dashcam photographs and establish potential hazards {that a} driver ought to concentrate on.

For every picture:
1. Rigorously look at the visible scene
2. Determine any potential hazards (pedestrians, automobiles, highway situations, obstacles, and so on.)
3. Assess the urgency and severity of every hazard
4. Present a transparent, particular description of the hazard

Be exact and actionable in your hazard descriptions. Give attention to safety-critical info."""

immediate = ChatPrompt(
    messages=[
        {"role": "system", "content": system_prompt},
        {
            "role": "user",
            "content": [
                {"type": "text", "text": "{question}"},
                {
                    "type": "image_url",
                    "image_url": {
                        "url": "{image}",
                    },
                },
            ],
        },
    ],
)

# Initialize HRPO (Hierarchical Reflective Immediate Optimizer)
optimizer = HRPO(mannequin="openai/gpt-5.2", model_parameters={"temperature": 1})

# Run optimization
optimization_result = optimizer.optimize_prompt(
    immediate=immediate,
    dataset=dataset,
    validation_dataset=validation_dataset,
    metric=levenshtein_ratio,
    max_trials=10,
)

# Present outcomes
optimization_result.show()
Going Additional and Widespread Pitfalls
Now you’re finished together with your first optimization run. There are some extra suggestions when working with optimizers, and particularly when working with multi-modal brokers, to enter extra superior eventualities, in addition to avoiding some frequent anti-patterns:
- Mannequin Prices and Alternative: Multimodal prompts ship bigger payloads. Monitor token utilization within the Opik dashboard. If value is a matter, use a smaller imaginative and prescient mannequin. Working these optimizers via a number of loops can get fairly costly. On the time of publication on GPT 5.2, this instance value us about $0.15 USD. Monitor this as you run examples to see how the optimizer is behaving and catch any points earlier than you scale out.
- Mannequin Choice and Imaginative and prescient Assist: Double-check that your chosen mannequin helps photographs. Some very current mannequin releases might not be mapped but, so that you might need points. Hold your Python packages up to date.
- Dataset Picture Measurement and Format: Think about using JPEGs and lower-resolution photographs, that are extra environment friendly over large-resolution PNGs, which may be extra token-hungry as a result of their measurement. Take a look at how the mannequin behaves through direct API calls, the playground, and small trial runs earlier than scaling out. Within the demo we ran, the dataset photographs have been mechanically transformed by the SDK to JPEG (60% high quality) and a max top/width of 512 pixels, sample you might be welcomed to observe.
- Dataset Cut up: You probably have many examples, cut up into coaching/validation. Use a subset (
n_samples) throughout optimization to discover a higher immediate, and reserve unseen information to verify the advance generalizes. This prevents overfitting the immediate to a couple gadgets. - Analysis Metric Design: For Hierarchical Reflective optimizer, return a ScoreResult with a cause for every instance. These causes drive its root-cause evaluation. Poor or lacking causes could make the optimizer much less efficient. Different optimizers behave in a different way, so realizing that evaluations are important to success is vital, you can too see if LLM-as-a-judge is a viable analysis metric for extra complicated senarios.
- Iteration and Logging: The instance script mechanically logs every trial’s prompts and scores. Examine these to know how the immediate modified. If outcomes stagnate, strive growing
max_trialsor utilizing a distinct optimizer algorithm. You can even chain optimizers: take the output immediate from one optimizer and feed it into one other. It is a good approach to mix a number of approaches and ensemble optimizers to attain increased mixed effectivity. - Mix with Different Strategies: We will additionally mix steps and information into the optimizer utilizing bounding containers, including extra information via purpose-built visible processing fashions like Meta’s SAM 3 to annotate our information and supply extra metadata. In follow, our enter dataset may have picture and image_annotated, which can be utilized as enter to the optimizer.
Takeaways and Future Outlook of Optimizers
Thanks for following together with this. As a part of this walk-through, we explored:
- Getting began with open-source agent & immediate optimization
- Making a course of to optimize a multi-modal vision-based agent
- Evaluating with image-based datasets within the context of LLMs
Shifting ahead, automating immediate design is changing into more and more vital as vision-capable LLMs advance. Thoughtfully optimized prompts can considerably enhance mannequin efficiency on complicated multimodal duties. Optimizers present how we are able to harness LLMs themselves to refine directions, turning an extended, tedious, and really guide course of into a scientific search.
Wanting forward, we are able to begin to see new methods of working wherein automated prompts and agent-optimization instruments exchange outdated prompt-engineering strategies and totally leverage every mannequin’s personal understanding.
Loved This Article?
Vincent Koc is a extremely achieved AI analysis engineer, author, and lecturer with a wealth of expertise throughout quite a lot of world corporations and works primarily in open-source improvement in synthetic intelligence with a eager curiosity in optimization approaches. Be at liberty to attach with him on LinkedIn and X if you wish to keep linked or have any questions concerning the hands-on instance.
References
[1] Y Choi, et. al. Multimodal Immediate Optimization: Why Not Leverage A number of Modalities for MLLMs https://arxiv.org/abs/2510.09201
[2] M Suzgun, A T Kalai. Meta-Prompting: Enhancing Language Fashions with Process-Agnostic Scaffolding https://arxiv.org/abs/2401.12954
[3] Ok Charoenpitaks, et. al. Exploring the Potential of Multi-Modal AI for Driving Hazard Prediction https://ieeexplore.ieee.org/doc/10568360 & https://github.com/DHPR-dataset/DHPR-dataset
[4] F. Yu, et. al. BDD100K: A Numerous Driving Dataset for Heterogeneous Multitask Studying https://arxiv.org/abs/1805.04687 & https://bair.berkeley.edu/weblog/2018/05/30/bdd/
[5] Chen et. al. MLLM-as-a-Choose: Assessing Multimodal LLM-as-a-Choose with Imaginative and prescient-Language Benchmark https://dl.acm.org/doi/10.5555/3692070.3692324 & https://mllm-judge.github.io/
[6] Opik. HRPO (Hierarchical Reflective Immediate Optimizer) https://www.comet.com/docs/opik/agent_optimization/algorithms/hierarchical_adaptive_optimizer & https://www.comet.com/web site/merchandise/opik/options/automatic-prompt-optimization/
[7] Meta. Introducing Meta Phase Something Mannequin 3 and Phase Something Playground https://ai.meta.com/weblog/segment-anything-model-3/


